

Cowgirl hats have evolved into a versatile accessory used not only for western wear but also for creative styling, fashion customization, and decorative DIY projects. In recent Pinterest ideas, decorated cowgirl hats have become a strong visual trend across fashion boards, home styling inspiration, festival outfits, and handmade creative displays. This article explores practical and beginner friendly ways to transform a simple cowgirl hat into a personalized statement piece using accessible materials and design approaches.
The focus of these cowgirl hat decorating ideas is to help readers understand how to enhance a basic hat through creative techniques such as painting, fabric additions, beadwork, floral arrangements, ribbon layering, and texture mixing. Each method is explained step by step so it can be followed at home without advanced crafting experience. Whether the goal is a modern aesthetic, minimalist style, rustic charm, or bold festival look, these ideas provide structured inspiration that fits a wide range of personal styles. Readers will also learn how to plan materials, maintain balance in design, and achieve a polished handmade finish suitable for fashion use or display.
Why This Idea Is Trending or Useful
Cowgirl hat customization has become increasingly popular in Pinterest ideas because it combines fashion expression with simple DIY accessibility. People are drawn to projects that allow individuality without requiring expensive tools or professional skills. A cowgirl hat offers a large surface area that naturally supports decoration, making it ideal for creative transformation. This aligns with modern design preferences where handmade accessories and personalized styling are highly valued.
The trend is also supported by the rise of aesthetic fashion movements, including western-inspired outfits, festival styling, and minimalist handmade accessories. These hats can be adapted for seasonal decoration, themed events, or everyday fashion statements. The appeal lies in flexibility, as the same base hat can be transformed into multiple creative versions using different materials and arrangements. This makes it a practical and budget-friendly creative project for beginners who want to explore DIY decoration while achieving visually strong and wearable results.
Materials and Preparation
Before starting cowgirl hat decorating ideas, proper preparation ensures a smoother creative process and a more balanced final result. The essential materials depend on the chosen design style but typically include fabric glue, hot glue tools, acrylic paints, brushes, ribbons, faux flowers, beads, feathers, lace trims, and lightweight decorative elements. A plain cowgirl hat made of felt, straw, or wool serves as the base structure. It is important to select a hat that maintains shape and can support light attachments without deforming.
Preparation also involves planning the design layout before applying any materials. Sketching a simple arrangement helps avoid overcrowding and ensures visual balance. Cleaning the hat surface is necessary to remove dust or residue so adhesives hold properly. Organizing materials by category such as color, texture, and size allows better workflow during decoration. This preparation phase is essential for achieving a clean, intentional design rather than a random or cluttered appearance. Proper planning supports beginner friendly execution and improves the final aesthetic quality.
Idea 1: Minimalist Ribbon Wrap Cowgirl Hat
How to Create
A minimalist ribbon wrap design focuses on subtle elegance using clean lines and controlled decoration. This approach is ideal for those who prefer modern design and understated aesthetic styling. The idea is to enhance the cowgirl hat without overwhelming its natural shape. Ribbon wrapping creates a soft visual accent that follows the curve of the hat’s crown or brim. Neutral tones such as beige, white, black, or soft pastels are commonly used in minimalist Pinterest ideas because they maintain simplicity while adding refinement. The goal is to create a balanced appearance where decoration complements rather than dominates the hat’s structure. This style works well for casual wear, outdoor events, and coordinated outfits where subtle accessory enhancement is preferred.
Step-by-Step Guide
To create this design, start by selecting a single ribbon type such as satin, cotton, or linen depending on the desired texture. Measure the circumference of the hat area you want to decorate and cut the ribbon accordingly. Apply small sections of fabric glue or use discreet stitching to secure the ribbon in place. Wrap it evenly around the hat without twisting to maintain a clean line. Press gently to ensure adhesion and smooth out any folds. Allow drying time before wearing or handling. Additional layers can be added using thinner ribbon strips for variation, but the design should remain minimal. This DIY approach is beginner friendly and requires only basic materials, making it an easy project for those exploring creative cowgirl hat decoration.

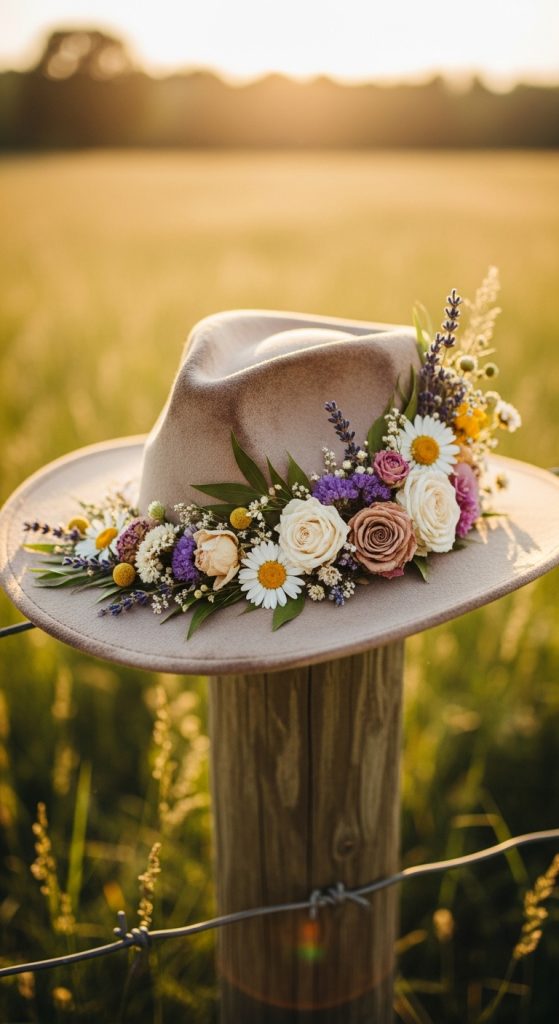
Idea 2: Floral Boho Cowgirl Hat Design
How to Create
A floral boho cowgirl hat design introduces natural texture and color through artificial or dried flowers arranged around the hat. This style is widely used in Pinterest ideas because it blends rustic charm with soft aesthetic appeal. The boho look emphasizes organic placement, uneven patterns, and layered textures that mimic natural growth. Flowers such as daisies, roses, lavender, and wildflower styles are commonly used to create a relaxed and artistic feel. This design works well for outdoor events, photography styling, and seasonal decoration. It adds visual depth while maintaining a lightweight structure that remains wearable.
Step-by-Step Guide
Begin by selecting lightweight faux or dried flowers that match a consistent color palette. Remove excess stems and prepare small clusters for easier placement. Use fabric glue or a hot glue gun to attach flowers around the brim or one side of the hat. Start with larger flowers as anchor points, then fill gaps with smaller blooms and greenery elements. Avoid overcrowding by leaving natural spacing between clusters. Press each piece gently to secure adhesion. Allow drying time before adjusting placement. This DIY method is flexible, allowing customization based on color themes or seasonal inspiration. It is a beginner friendly creative project that enhances home decor styling and personal fashion expression.
Idea 3: Beaded Western Accent Hat
How to Create
A beaded cowgirl hat design introduces texture and shine through carefully arranged bead patterns. This idea fits well within modern Pinterest inspiration focused on handmade detailing and creative project customization. Beads can be used to create subtle borders, geometric patterns, or scattered accents that reflect light and add depth. The aesthetic can range from rustic wooden beads for earthy tones to glossy beads for a more modern design. This style is particularly effective for those who want a slightly decorative but still wearable hat suitable for casual or themed outfits.
Step-by-Step Guide
Start by selecting beads in a consistent color palette that complements the hat base. Prepare a thin thread or strong adhesive depending on whether stitching or gluing is preferred. Plan a simple design layout before application to avoid uneven spacing. Attach beads one section at a time, starting with focal areas such as the brim edge or hat band area. Ensure each bead is securely fixed before moving forward. Allow sufficient drying or setting time if glue is used. The design should remain balanced, avoiding excessive clustering. This DIY method requires patience but is still beginner friendly and allows for detailed customization.

Idea 4: Painted Western Pattern Hat
How to Create
A painted cowgirl hat design allows full creative freedom through color and pattern application. This approach is popular in Pinterest ideas because it transforms the hat into a personalized canvas. Patterns such as geometric lines, floral sketches, desert-inspired motifs, or abstract brush strokes can be used depending on style preference. Acrylic paint is commonly chosen due to its durability and strong color coverage. This design works especially well for those interested in artistic expression and modern handmade aesthetics.
Step-by-Step Guide
Begin by cleaning the hat surface to ensure paint adhesion. Lightly sketch the design using a pencil or chalk guide. Apply acrylic paint using fine brushes for details and broader brushes for background areas. Work in thin layers to avoid cracking or uneven texture. Allow each layer to dry before adding additional color or detail. Once complete, seal the design with a protective spray to preserve durability. This DIY project requires patience but offers high customization potential. It is suitable for beginners who want to explore creative ideas through painting and visual design planning.

Idea 5: Lace Trim Elegant Hat Design
How to Create
A lace trim cowgirl hat design introduces softness and elegance through delicate fabric detailing. This style is often seen in aesthetic Pinterest ideas that focus on romantic and vintage-inspired fashion. Lace adds texture without overwhelming the hat structure, making it ideal for subtle decoration. It can be applied along the brim or used as a layered band around the crown. The design works well for formal styling, photography sessions, or decorative display purposes.
Step-by-Step Guide
Select lace material in a neutral or complementary tone. Measure the required length based on placement area. Apply fabric glue evenly along the attachment line and carefully press the lace into place. Ensure smooth alignment without wrinkles. Trim excess material and secure edges properly. Allow full drying time before use. Additional layers can be added for depth, but the design should remain light and elegant. This beginner friendly DIY method is simple yet effective for achieving a refined decorative result.

Idea 6: Feather Accent Statement Hat
How to Create
A feather accent cowgirl hat design focuses on bold visual impact using lightweight feather elements. This idea is popular in creative Pinterest inspiration because feathers naturally create movement and texture. They can be arranged in clusters or single focal points depending on the desired effect. This design is often used for festival styling or themed outfits where expressive accessories are preferred.
Step-by-Step Guide
Choose feathers in complementary colors and trim them if necessary. Arrange them into small bundles before attachment. Use strong adhesive or stitching to secure them to one side of the hat or along the brim. Press gently and hold until fixed. Ensure balanced placement so the hat remains wearable and visually stable. Allow full drying time before handling. This DIY project is simple and allows expressive customization through color and arrangement.

Idea 7: Rope and Leather Western Wrap Hat
How to Create
A rope and leather cowgirl hat design emphasizes traditional western styling with textured materials. This idea reflects rustic Pinterest inspiration and works well for classic fashion themes. Rope adds structure while leather introduces durability and contrast. The combination creates a strong visual identity suitable for themed outfits or decorative use.
Step-by-Step Guide
Select thin rope and flexible leather strips. Measure the hat circumference and cut materials accordingly. Wrap rope around the crown or brim and secure with adhesive. Add leather strips as overlay accents or crossing bands. Ensure tight and even placement. Allow drying time before adjustment. This DIY method is beginner friendly and focuses on structured layering for a rustic aesthetic finish.

Idea 8: Crystal and Gem Accent Hat
How to Create
A crystal and gem cowgirl hat design adds shine and decorative brilliance through reflective elements. This style is often used in modern Pinterest ideas for glamorous and festival-inspired aesthetics. Gems can be arranged in patterns or scattered for a sparkling effect.
Step-by-Step Guide
Select lightweight decorative gems and plan placement. Apply adhesive to small sections and attach gems carefully. Focus on balance and avoid overcrowding. Allow full drying time. This DIY project enhances visual impact with minimal effort and is suitable for beginners exploring decorative styling.

Idea 9: Patchwork Fabric Cowgirl Hat
How to Create
A patchwork fabric design introduces multiple textures and patterns into one hat. This idea aligns with creative Pinterest ideas focused on handmade and artistic expression. Fabric pieces can represent different colors or themes.
Step-by-Step Guide
Cut small fabric pieces and arrange them in a planned layout. Glue each piece carefully, overlapping slightly for texture. Smooth edges and ensure full coverage where needed. Allow drying time. This DIY method is highly customizable and beginner friendly.

Idea 10: Seasonal Themed Decorative Hat
How to Create
A seasonal themed cowgirl hat adapts decoration based on holidays or seasonal inspiration. This idea is widely used in Pinterest ideas for home decor coordination and event styling.
Step-by-Step Guide
Select seasonal elements such as colors, small ornaments, or themed accents. Arrange decorations in a balanced layout. Attach using glue and allow drying. This DIY approach is flexible and reusable for different seasons.

Common Beginner Mistakes and How to Avoid Them
One common mistake in cowgirl hat decorating ideas is overloading the design with too many elements, which creates visual imbalance. Beginners often place decorations without planning, leading to cluttered results. Another issue is using heavy materials that cause the hat to lose shape. Poor adhesive application can also result in decorations falling off over time. To avoid these problems, it is important to plan the design beforehand, use lightweight materials, and apply glue in controlled amounts. Maintaining spacing between decorative elements ensures a clean and intentional look that aligns with modern Pinterest ideas.
Practical Tips for Better Results
For better results in DIY cowgirl hat decoration, always work in stages instead of applying everything at once. Start with base elements and gradually build layers. Stick to a consistent color palette to maintain visual harmony. Test material placement before permanent fixing. Use lightweight materials to preserve hat structure. These tips help improve durability and aesthetic quality while keeping the project beginner friendly and manageable.
Styling, Presentation, or Organization Ideas
Decorated cowgirl hats can be styled as fashion accessories, photography props, or home decor display items. For presentation, place them on stands or wall hooks to highlight design details. Organize materials by texture and color before starting the project to improve workflow. Pair hat designs with coordinated outfits for a complete aesthetic look. These approaches enhance visual impact and make the handmade project more versatile in use.
Budget or Time Planning
Cowgirl hat decorating ideas can be completed on a flexible budget depending on material selection. Basic DIY versions using ribbons and simple glue are low cost and beginner friendly. More detailed designs using beads, feathers, or fabric may require additional planning. Most projects can be completed within a few hours to one day depending on complexity. Proper preparation reduces time waste and improves efficiency in execution.
Creative Expansion and Advanced Inspiration
Advanced cowgirl hat decoration can include mixed media techniques such as combining painting with beadwork or integrating layered fabric textures with metallic accents. Personalized designs such as initials, symbolic patterns, or themed storytelling elements can elevate the project further. Exploring modern design and minimalist style variations allows for professional looking results. These creative expansions help transform simple DIY projects into highly aesthetic handmade fashion pieces suitable for display or styling use.