

Wedding bun hairstyles remain one of the most searched Pinterest ideas because they combine elegance, structure, and long-lasting wear in a single look. A bun is not just a hairstyle; it is a carefully crafted arrangement that enhances facial features, complements bridal attire, and holds its shape through long ceremonies and celebrations. In modern bridal styling, buns have evolved into versatile designs that range from sleek minimalist forms to intricate textured arrangements decorated with accessories. This article explores 10 detailed wedding bun hairstyle ideas that are practical, beginner friendly, and adaptable for different hair types and wedding themes. Each idea is explained in a step-by-step manner so readers can understand the structure, preparation, and styling approach behind each look. Whether the goal is a traditional aesthetic or a modern soft-glam finish, these Pinterest ideas provide inspiration for creating polished and lasting results suitable for home practice or professional styling guidance.
Why This Idea Is Trending or Useful
Wedding bun hairstyles are trending widely across Pinterest because they offer a balance of tradition and modern design flexibility. Many brides prefer buns due to their ability to maintain structure throughout long events while still allowing creative expression through twists, braids, and accessories. The rise of DIY beauty culture has also contributed to their popularity, as many individuals search for easy project styling methods that can be practiced at home before the actual event. These hairstyles are also highly adaptable, making them suitable for different hair lengths and textures with minor adjustments. From minimalist styles to heavily decorated buns, the variety allows users to personalize their look without requiring advanced hairstyling skills. Another reason for their popularity is their compatibility with veils, jewelry, and traditional outfits, making them a central part of home decor-inspired wedding planning aesthetics often seen on Pinterest boards.
Materials and Preparation
Before creating wedding bun hairstyles, preparation plays a crucial role in achieving a polished result. The basic materials include a comb, hairbrush, hair elastics, bobby pins, and sectioning clips. Styling products such as lightweight mousse, smoothing serum, and hairspray help maintain structure and reduce frizz. Heat tools like curling irons or straighteners may be needed depending on the desired texture. Proper preparation begins with clean, dry, or slightly textured hair to ensure grip and hold. Hair should be detangled thoroughly to avoid uneven sections during styling. Planning also involves selecting the desired bun style in advance, considering factors such as face shape, dress neckline, and wedding theme. Accessories like pins, floral elements, or decorative combs can be prepared ahead of time to ensure smooth execution. Organizing all materials before starting reduces styling time and improves precision, making the process more efficient and beginner friendly for anyone following Pinterest hairstyle ideas.
Idea 1: Classic Low Bridal Bun Elegance
How to Create
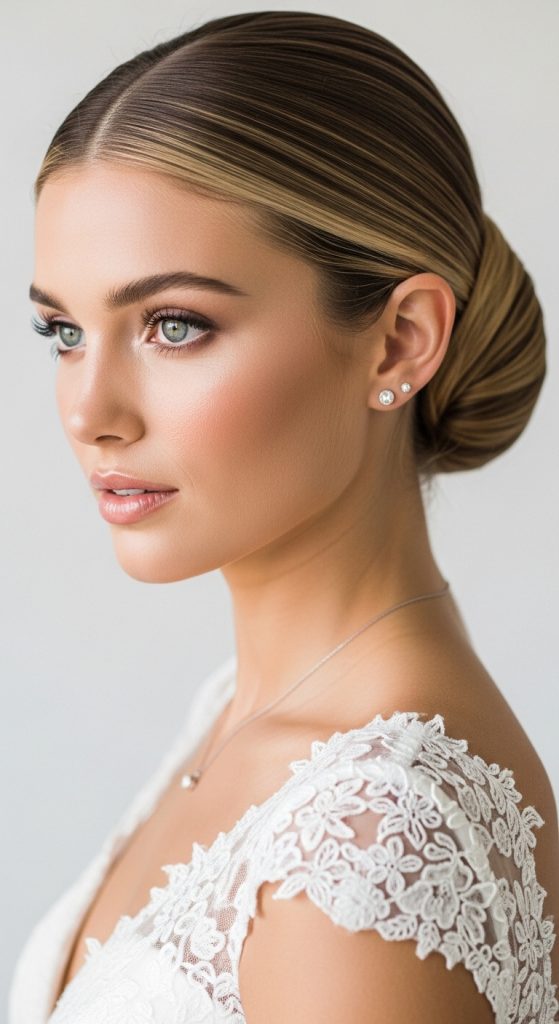
The classic low bridal bun is one of the most timeless Pinterest ideas for weddings because it emphasizes simplicity, structure, and elegance. It sits at the nape of the neck, creating a soft yet refined silhouette that pairs well with traditional and modern bridal outfits. This style is especially popular for its ability to highlight facial features and jewelry such as earrings or necklaces. The bun is smooth and controlled, often featuring a center or side parting depending on preference. Its minimalist design makes it suitable for brides who prefer a clean aesthetic without excessive detailing. The style also works well for various hair textures when properly prepared, making it a reliable option for different hair types. Its popularity in home decor-inspired wedding planning comes from its adaptability and understated beauty, which aligns with modern minimalist style trends often seen on Pinterest boards.
To create this hairstyle, begin by brushing the hair thoroughly and applying a smoothing product to reduce frizz. Gather the hair into a low ponytail at the nape of the neck and secure it with an elastic band. Twist the ponytail gently and wrap it around its base to form a bun shape. Secure the bun using bobby pins, ensuring even placement for stability. Lightly adjust the bun to achieve a balanced shape and tuck in any loose strands. Finish with a light hairspray to hold the structure in place throughout the event. Optional accessories such as pearl pins or delicate combs can be added for subtle decoration. This step-by-step method ensures a polished result that is beginner friendly and suitable for DIY styling practice before the wedding day.
Idea 2: Braided Crown Bun Design
How to Create
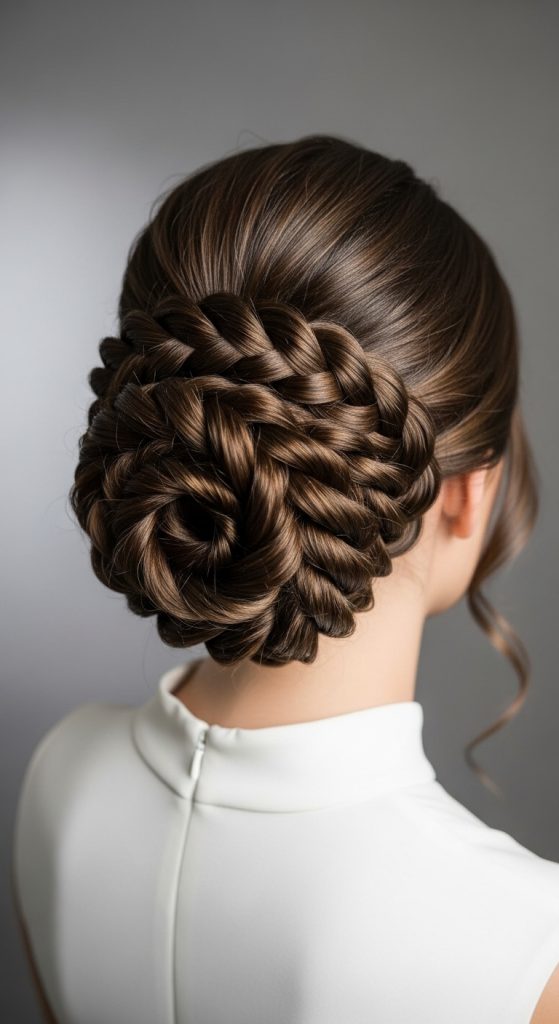
The braided crown bun combines intricate braiding with a structured bun to create a romantic and detailed wedding hairstyle. This design wraps braids around the head before forming a bun at the back, giving a crown-like effect that enhances bridal elegance. It is especially popular in Pinterest ideas for outdoor weddings and bohemian themes due to its soft yet structured appearance. The braided elements add texture and dimension, making the hairstyle visually rich without appearing overly complex. This bun style works well with medium to long hair and can be adapted to include multiple braid types such as Dutch or French braids. It offers a balance between traditional styling and creative expression, making it a favorite among DIY enthusiasts who enjoy creative projects that elevate their overall look.
To create this style, start by sectioning the hair into two front portions and braiding each side tightly along the scalp. Secure the braids at the back of the head and gather the remaining hair into a low or mid ponytail. Twist the ponytail into a bun and secure it with pins. Wrap the braids around the bun base to form a crown effect, ensuring they are evenly placed. Adjust volume by gently loosening braid sections for a softer appearance. Finish with styling spray to maintain hold. This method requires patience but is beginner friendly when followed step by step, making it ideal for those exploring Pinterest hairstyle tutorials for wedding inspiration.

Idea 3: Messy Textured Bridal Bun
How to Create
The messy textured bridal bun is a modern interpretation of traditional bun styling, designed to create a soft, effortless aesthetic. It is widely featured in Pinterest ideas due to its relaxed structure and romantic finish. Unlike sleek buns, this style embraces natural volume and loose strands, giving it a soft and airy appearance. It is ideal for brides who prefer a less rigid look while still maintaining elegance. The texture adds depth, making it suitable for both indoor and outdoor weddings. This hairstyle works especially well for medium to thick hair, as volume enhances the overall effect. It reflects modern minimalist style trends while still allowing creative flexibility in arrangement.
To create this bun, begin by adding light texture using curling or wave techniques. Gather the hair loosely into a low ponytail without tightening too much. Twist sections of hair and wrap them around the base to form an uneven bun structure. Secure with pins while allowing some strands to remain loose for softness. Gently pull sections of the bun to create volume and texture. The goal is not perfection but controlled looseness. Finish with flexible hold spray to maintain shape while preserving movement. This method is easy to follow and widely used in DIY tutorials because it allows beginners to achieve a stylish wedding look without precision styling pressure.

Idea 4: Sleek High Bun Sophistication
How to Create
The sleek high bun is a polished wedding hairstyle that sits at the crown of the head, creating a lifted and elegant silhouette. It is often chosen for its formal appearance and ability to elongate the neck and enhance facial structure. This style is popular in modern Pinterest ideas for minimalist weddings and structured bridal fashion. Its smooth finish gives it a clean aesthetic that pairs well with high-neck dresses or statement jewelry. The sleek bun emphasizes precision and control, making it a favorite for those who prefer a refined and contemporary look. It also holds well throughout long events due to its secure placement and tight structure.
To create this hairstyle, begin by straightening the hair for a smooth base. Apply gel or smoothing serum to reduce flyaways. Gather the hair into a high ponytail at the crown and secure it tightly. Twist the ponytail and wrap it around its base to form a compact bun. Use bobby pins to secure all sections firmly. Smooth the surface with a brush and apply finishing spray for hold and shine. This step-by-step process ensures a sleek, professional finish that is beginner friendly when done carefully, making it a reliable choice for wedding preparation practice.

Idea 5: Floral Accented Romantic Bun
How to Create
The floral accented romantic bun is a soft, decorative hairstyle that integrates natural or artificial floral elements into a structured bun design. It is widely featured in Pinterest ideas for garden weddings, outdoor ceremonies, and romantic-themed events. The bun serves as a base while flowers add color, texture, and natural elegance. This style enhances bridal aesthetics by creating a harmonious blend of hairstyle and decoration. It works well with loose textures or semi-smooth finishes, depending on the desired level of softness. The floral elements can be arranged symmetrically or asymmetrically to match personal styling preferences.
To create this hairstyle, start by forming a low or mid bun using twisted or wrapped sections of hair. Secure the bun with pins and ensure it has a stable base. Once the structure is complete, carefully insert floral pins or small flower clusters into the bun and surrounding areas. Adjust placement to create balance and visual harmony. Light hairspray helps maintain both the hairstyle and decorative elements. This method is easy to customize and widely used in DIY wedding styling because it allows personalization through different floral arrangements and color themes.

Idea 6: Twisted Rope Bun Style
How to Create
The twisted rope bun is a structured yet creative hairstyle formed by twisting sections of hair into rope-like strands before wrapping them into a bun. It is a popular Pinterest idea because it combines simplicity with visual complexity. The twisting technique creates defined texture that enhances the overall appearance of the bun. This style works well for medium to long hair and provides strong hold due to the twisted structure. It is suitable for brides who prefer a balanced look between sleek and textured styling. The rope effect adds dimension without requiring intricate braiding techniques.
To create this hairstyle, divide the hair into two or more sections and twist each section tightly. Wrap the twisted sections around each other to form a rope effect, then coil the structure into a bun shape. Secure with pins at multiple points to maintain stability. Adjust the bun gently to ensure even spacing and balanced shape. Apply finishing spray to hold the style in place. This method is beginner friendly and often used in step-by-step tutorials because it requires minimal tools while delivering a polished and structured wedding look.
Idea 7: Side Swept Low Bun Charm
How to Create
The side swept low bun is a soft and elegant hairstyle that positions the bun slightly to one side of the neck, creating an asymmetrical yet balanced look. It is a popular choice in Pinterest ideas for brides seeking subtle uniqueness in their hairstyle. The side placement adds visual interest while maintaining traditional bun structure. This style works well with wavy or straight hair and complements off-shoulder or asymmetrical dresses. Its charm lies in its simplicity combined with gentle movement, making it suitable for romantic wedding themes.
To create this hairstyle, sweep the hair gently to one side and secure it into a low side ponytail. Twist the hair loosely and wrap it into a bun near the side of the neck. Secure with pins while maintaining a soft structure. Pull a few strands loosely around the face to enhance softness. Finish with light spray for hold. This process is easy to follow and widely used in DIY styling tutorials because it offers elegance without complexity.

Idea 8: Voluminous Bun with Puff Detail
How to Create
The voluminous bun with puff detail is a dramatic wedding hairstyle designed to add height and structure at the crown while maintaining a full bun at the back. It is frequently seen in Pinterest ideas for traditional and formal weddings. The puff adds elegance and enhances facial proportions, making the hairstyle more pronounced. This style works well for thick hair or hair extensions and is often chosen for grand wedding settings. It blends classic styling with volume-enhancing techniques for a bold yet refined look.
To create this hairstyle, section the front hair and tease it gently to create volume. Smooth the top layer and secure the puff at the crown. Gather the remaining hair into a low or mid bun and secure it firmly. Combine the puff and bun structure using pins for stability. Adjust volume as needed for balance. Finish with strong hold spray. This method requires moderate effort but remains beginner friendly with step-by-step practice.

Idea 9: Braided Bun with Hidden Details
How to Create
The braided bun with hidden details is a creative hairstyle where small braids are incorporated into the bun structure and partially concealed for texture. It is popular in Pinterest ideas due to its subtle complexity and elegant finish. The hidden braids add depth without overwhelming the overall look. This style is suitable for brides who prefer intricate detail within a controlled design. It works well with medium to long hair and can be adapted for both sleek and textured finishes.
To create this hairstyle, section small parts of hair and braid them tightly. Gather the rest of the hair into a low bun and secure it. Wrap the braids into the bun structure, allowing some to remain partially visible. Secure everything with pins and adjust shape for balance. Finish with light spray for hold. This method is ideal for DIY enthusiasts exploring creative hairstyle tutorials.

Idea 10: Minimal Knot Bun Design
How to Create
The minimal knot bun is a simple yet stylish hairstyle created by knotting sections of hair instead of twisting or braiding. It is widely used in Pinterest ideas for minimalist style weddings. The knot structure gives a modern artistic appearance while maintaining simplicity. This style is suitable for all hair types and works especially well for contemporary bridal themes. It reflects clean design principles often seen in modern home decor and aesthetic inspiration boards.
To create this hairstyle, divide the hair into sections and tie them into loose knots. Continue layering knots until the hair forms a bun-like shape. Secure with pins and adjust for symmetry. Apply light spray to hold the structure. This method is one of the easiest DIY hairstyle approaches and is ideal for beginners exploring creative yet minimal wedding looks.

Common Beginner Mistakes and How to Avoid Them
Many beginners struggle with uneven sectioning, excessive product use, or weak pin placement when creating wedding buns. One common mistake is not preparing the hair properly, which leads to poor structure and flyaways. Another issue is over-tightening, which reduces comfort and creates unnatural tension. Using too few pins can also cause the bun to loosen over time. To avoid these mistakes, it is important to follow a step by step approach, ensure proper hair preparation, and use balanced product application. Practicing the hairstyle before the wedding day also helps identify adjustments needed for better results.
Practical Tips for Better Results
Achieving a polished bun hairstyle requires attention to detail and controlled styling techniques. Light texturizing before styling improves grip and stability. Using sectioning clips helps maintain organization during the process. Choosing the right bun placement based on face shape enhances overall appearance. Keeping styling tools ready before starting improves efficiency. Light finishing sprays help maintain structure without stiffness. These small improvements contribute significantly to achieving professional-looking results in DIY wedding hairstyling.
Styling, Presentation, or Organization Ideas
Presentation plays a key role in wedding bun hairstyles. Accessories such as pins, combs, or floral elements should be placed strategically rather than randomly. Balancing symmetry ensures a clean finish, while controlled looseness can add softness. Matching the hairstyle with dress design and makeup enhances overall harmony. Organizing hair sections neatly before styling improves precision. These styling approaches help create visually appealing results that align with Pinterest aesthetic inspiration and modern bridal design principles.
Budget or Time Planning
Wedding bun hairstyles can be completed efficiently with proper planning. Most styles require minimal tools, making them suitable for budget ideas and DIY execution. Time management involves practicing the hairstyle in advance and setting aside enough time for adjustments. Simple buns may take less than an hour, while more detailed styles require additional preparation. Planning ahead reduces stress and ensures smoother execution on the wedding day. Using basic materials effectively helps achieve professional results without high cost.
Creative Expansion and Advanced Inspiration
Wedding bun hairstyles can be expanded into more advanced designs by combining multiple techniques such as braiding, twisting, and layering. Accessories can be integrated in innovative ways to enhance visual appeal. Textured layering and asymmetrical designs offer modern variations. Experimenting with volume placement and decorative elements allows for personalized styling. These creative expansions help transform simple buns into unique artistic expressions suitable for advanced Pinterest inspiration boards and evolving bridal fashion trends.