Melted crayon heart projects are a popular creative direction in modern Pinterest ideas because they combine color blending, simple crafting methods, and expressive handmade design. This concept uses broken or whole crayons melted into heart-shaped forms, producing unique textures and layered color effects that cannot be replicated through traditional coloring methods. The process is widely used in DIY crafts, home decor accents, and beginner friendly art activities because it requires minimal tools while delivering visually striking results. It also supports creative exploration through color mixing, heat transformation, and shape control.
In this topic, readers will learn how to create different melted crayon heart variations, how to manage melting techniques safely, and how to use finished pieces for decoration or gifting. The focus is on practical execution, step by step methods, and creative inspiration that fits modern aesthetic and minimalist style preferences. These projects are suitable for home crafting sessions, school activities, and budget ideas where accessible materials are preferred.
Why This Idea Is Trending or Useful
Melted crayon heart designs have become widely shared across Pinterest ideas because they transform simple school materials into artistic decorative pieces. The visual appeal comes from the unpredictable blending of colors during the melting process, which creates a natural gradient effect. This aligns with modern home decor trends that value handmade, aesthetic, and organic-looking creative outcomes. The process also encourages experimentation, making it appealing for beginners who want easy project options without complex tools or advanced skills.
Another reason for its popularity is accessibility. Most households already have crayons, making this a budget friendly and easy project. It supports DIY culture by encouraging reuse of materials instead of purchasing specialized craft supplies. The technique also fits well into creative project planning for seasonal decorations, personalized gifts, and organization-based crafts. Its versatility allows it to be adapted into wall art, ornaments, or functional decor items.
Materials and Preparation
To begin melted crayon heart projects, the required materials are simple and widely available. The main material is crayons, preferably in multiple colors for better visual blending. A heart-shaped mold or cutter is needed to define the final shape. Heat application can be done using an oven or controlled heat tool, depending on the method chosen. Additional materials may include baking paper, protective surface covers, and basic tools for breaking crayons into smaller pieces.
Preparation involves sorting crayons by color groups if a structured design is desired or mixing randomly for abstract effects. The workspace should be protected from wax spills or stains. Planning the color arrangement inside the heart mold helps control the final aesthetic outcome. It is also important to ensure even distribution of crayon pieces so that melting occurs uniformly. Proper preparation improves both safety and the quality of the finished design.
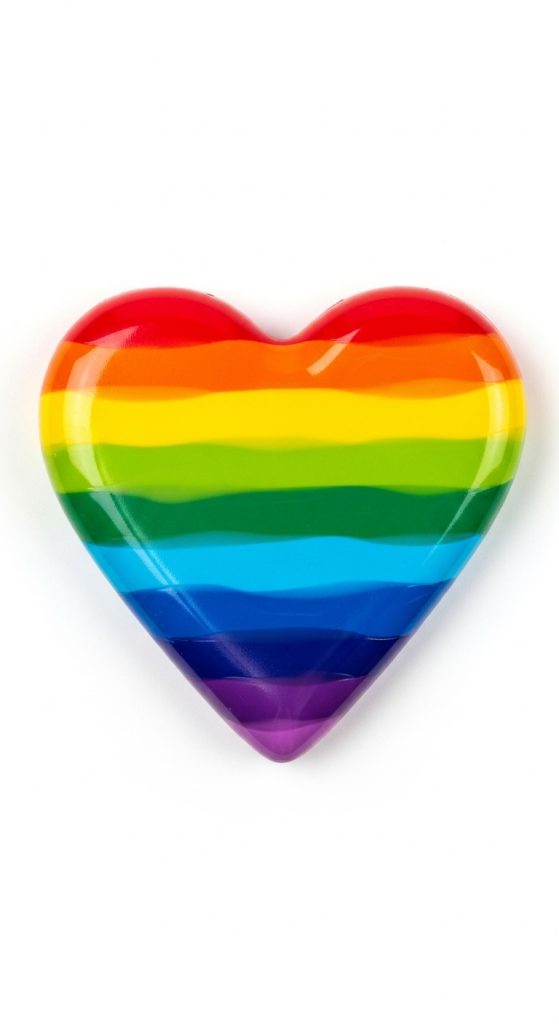
Idea 1: Rainbow Melted Heart Gradient Art
How to Create
Rainbow melted crayon hearts focus on creating a smooth transition of colors from one side of the heart to the other. This design is widely used in Pinterest ideas because it produces a visually balanced gradient effect that resembles modern aesthetic art. The key concept is controlled color placement before melting, allowing each shade to blend naturally during heat exposure. The final result appears layered, vibrant, and visually soft, making it suitable for home decor displays or creative handmade gifts.
The process begins by selecting crayons in rainbow order and breaking them into small pieces. These pieces are placed inside a heart-shaped mold in a structured gradient sequence. Once arranged, the mold is gently heated until the crayons begin to melt and merge. Careful monitoring ensures that colors blend without overmixing. After cooling, the heart solidifies into a smooth gradient piece that reflects a seamless rainbow transition.
Execution Process
The execution requires attention to spacing and heat control. Crayon pieces should be evenly distributed to avoid color clustering. During heating, the wax softens and flows, naturally merging adjacent colors. This step is crucial for achieving a clean gradient effect rather than a muddy blend.
Once melted completely, the mold should be left to cool without movement to preserve the layered structure. After removal, the heart can be used as wall decor or part of a DIY creative project collection. This idea is beginner friendly and fits well into modern design themes.
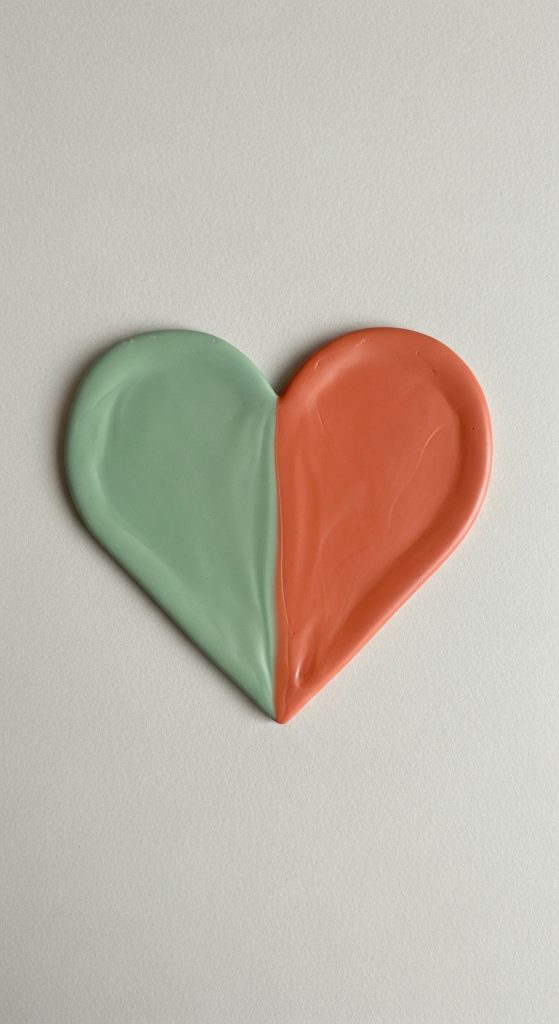
Idea 2: Dual-Tone Minimalist Melted Hearts
How to Make
Dual-tone melted crayon hearts focus on simplicity and contrast, using only two colors to create a clean and modern aesthetic style. This approach is popular in minimalist design because it avoids visual overload while still maintaining artistic appeal. The contrast between the two colors creates a strong visual division that enhances the heart shape. This idea is suitable for home decor, organization-themed crafts, and structured creative projects where simplicity is preferred.
To create this design, two complementary or contrasting crayon colors are selected. Each color is placed on one side of the heart mold, ensuring a clear separation line. The mold is then heated evenly so both colors melt simultaneously. As the wax softens, a subtle blending may occur at the center, forming a natural transition. The result is a clean dual-tone heart that reflects controlled creativity.
Step-by-Step Guide
The process requires precise placement to maintain color separation. Crayon pieces should not overlap heavily to preserve the dual effect. Heating must be balanced to prevent one color from dominating the other.
After melting, the cooling stage is important to maintain structure. Once solidified, the heart can be displayed as part of minimalist home decor or used in DIY creative projects. The simplicity of this design makes it ideal for beginners exploring melted crayon crafts.
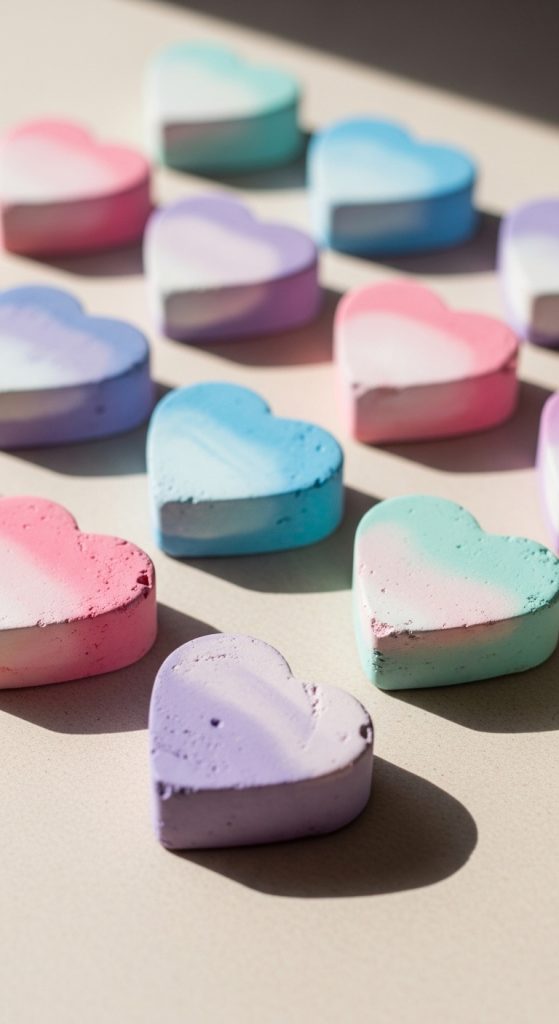
Idea 3: Pastel Soft Blend Heart Collection
How to Create
Pastel melted crayon hearts are designed to create soft, calming color transitions that align with aesthetic and minimalist style preferences. These designs are widely used in Pinterest ideas because they produce gentle tones that fit modern home decor themes. The focus is on using light shades to create a soothing visual effect rather than bold contrasts. This makes the final piece suitable for decorative arrangements or creative handmade collections.
To create pastel hearts, crayons in light tones such as soft pinks, blues, yellows, and greens are selected. These are broken into small pieces and arranged randomly inside a heart mold. When heated, the colors melt slowly and blend into a smooth pastel pattern. The result is a soft, cloud-like design that feels visually calm and balanced.
Step-by-Step Guide
The key to this method is avoiding dark or saturated colors, as they disrupt the pastel effect. Pieces should be evenly spaced to allow controlled melting. Heat should be applied gradually to maintain soft blending.
After cooling, each heart develops a unique pastel pattern. These can be arranged as a set for wall decoration or creative displays, making them ideal for DIY home decor projects.
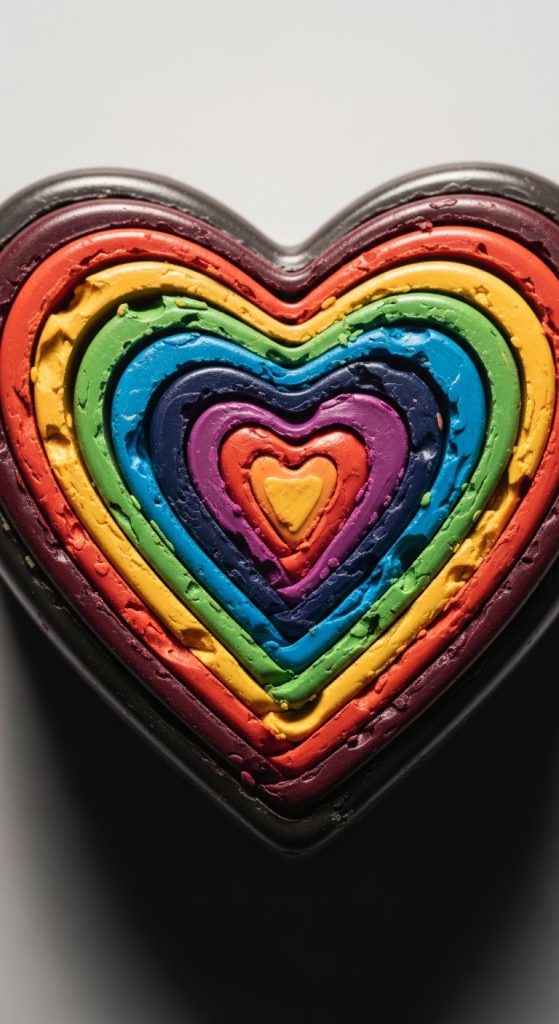
Idea 4: Layered Texture Melted Crayon Hearts
How to Create
Layered texture melted crayon hearts focus on building depth through multiple crayon layers rather than simple color blending. This idea is popular in creative projects because it produces a three-dimensional visual effect. Each layer contributes to the final texture, making the heart appear more dynamic and detailed. It is suitable for decorative pieces that aim to stand out in modern design arrangements.
The process begins by placing one layer of crayon pieces inside the mold, followed by partial melting. Once slightly set, another layer is added on top and reheated. This layering continues until the desired depth is achieved. The controlled melting process ensures that each layer remains partially visible, creating a stacked visual effect.
Execution Process
Careful timing is essential in this method. Each layer must be partially solidified before adding the next to prevent full color mixing. Heat control determines how defined the layers remain.
After final cooling, the heart shows visible strata of colors and textures. This makes it ideal for decorative displays, creative wall arrangements, and DIY artistic projects that emphasize structure and depth.
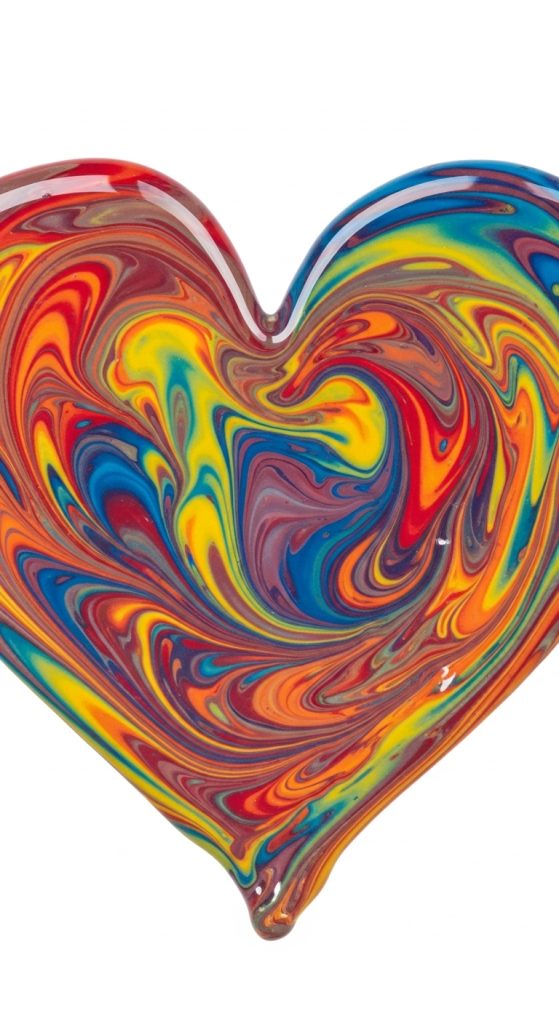
Idea 5: Marbled Abstract Melted Hearts
How to Create
Marbled melted crayon hearts are designed to create unpredictable swirling patterns that resemble natural stone or abstract art. This idea is widely appreciated in Pinterest ideas because it embraces randomness while still producing visually appealing results. The focus is on controlled chaos, where colors interact freely during melting to form unique patterns.
To create this effect, multiple crayon colors are randomly placed inside the mold without a structured arrangement. During heating, the wax melts and naturally flows into organic swirls. The mold is gently tilted or adjusted to encourage movement between colors. This produces a marbled effect that is different each time.
Step-by-Step Guide
The key to marbled design is avoiding over-organization. Crayon pieces should be mixed loosely to encourage free blending. Heat should be applied evenly to allow smooth movement of wax.
Once cooled, the heart reveals unique abstract patterns. Each piece becomes one of a kind, making it ideal for creative decor and handmade artistic displays.
Idea 6: Monochrome Elegant Melted Hearts
How to Create
Monochrome melted crayon hearts use different shades of a single color to create depth without introducing multiple hues. This design is popular in modern minimalist style because it maintains visual consistency while still offering variation in tone. It is suitable for refined home decor themes and structured DIY creative projects.
To create this design, crayons from one color family are selected, such as different shades of blue or red. These are arranged in a gradient sequence inside the mold. During melting, the shades blend gently, producing a layered monochrome effect. The final result is subtle yet visually rich.
Execution Process
The arrangement of shades is important for achieving smooth transitions. Darker tones should be placed strategically to guide visual flow. Heat must be controlled to avoid overmixing.
After cooling, the heart displays a cohesive monochrome gradient. This makes it ideal for aesthetic decoration, minimalist displays, and creative handmade collections focused on simplicity.

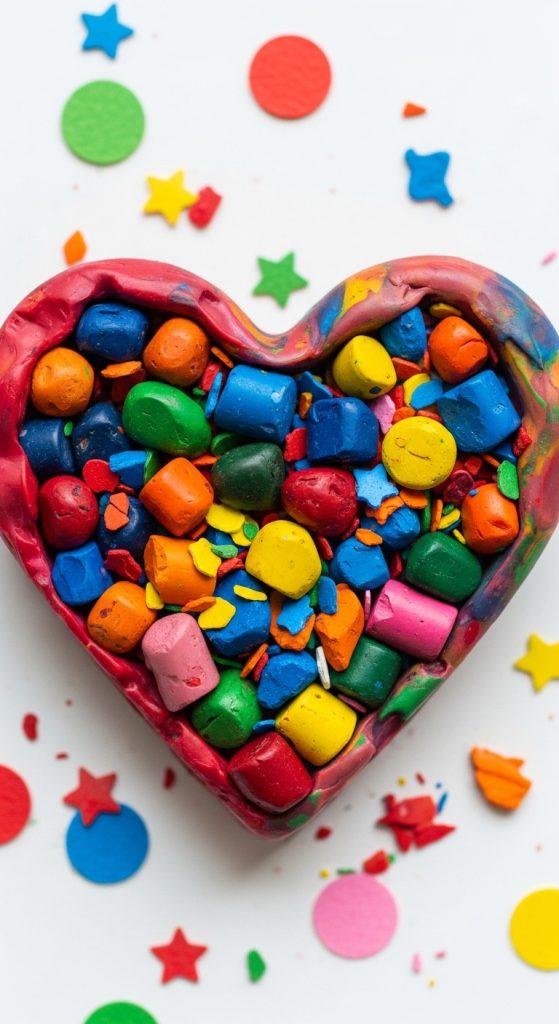
Idea 7: Confetti-Style Melted Heart Design
How to Create
Confetti-style melted crayon hearts focus on small, scattered color pieces that create a playful and energetic visual effect. This idea is often used in creative projects that emphasize fun, randomness, and vibrant expression. The final design resembles scattered confetti trapped in wax form.
To create this style, crayons are cut into very small fragments and mixed randomly inside the mold. Multiple colors are used to enhance visual variety. When heated, the fragments partially melt but retain some structure, creating a speckled appearance.
Step-by-Step Guide
The key is maintaining small crayon sizes so that pieces do not fully blend. Even distribution ensures balanced visual texture. Heat should be moderate to preserve fragment identity.
After cooling, the heart shows a lively confetti pattern. It is suitable for playful decor, DIY creative setups, and beginner friendly craft activities.
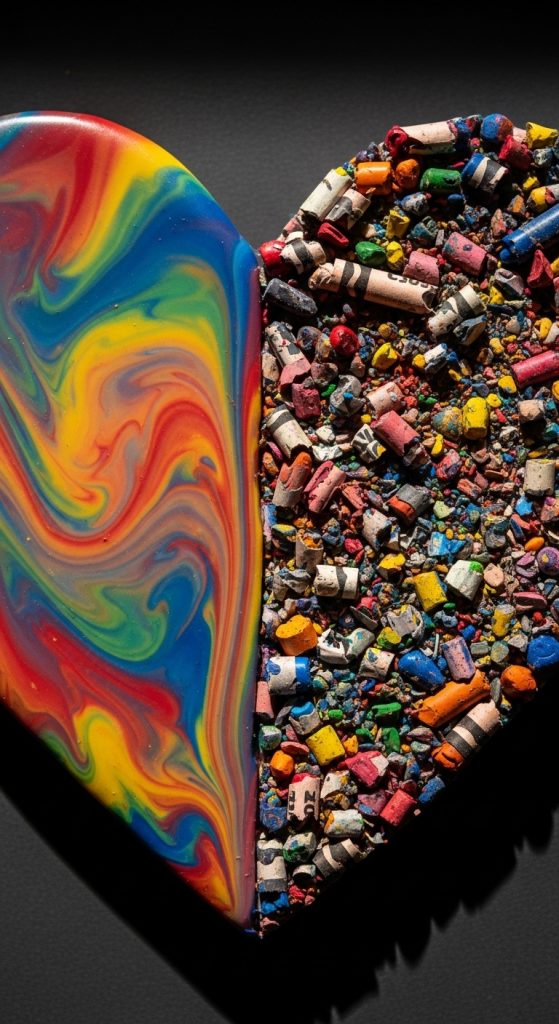
Idea 8: Two-Texture Split Melted Hearts
How to Create
Two-texture melted crayon hearts combine smooth and chunky melting styles within the same shape. This creates contrast between fully melted areas and partially solid fragments. It is commonly used in Pinterest ideas that focus on experimental design and visual contrast.
The mold is divided conceptually into two sections. One side uses finely broken crayons for smooth melting, while the other uses larger chunks. During heating, each side reacts differently, producing contrasting textures within the same heart shape.
Execution Process
Placement is essential for maintaining clear texture differences. Heat should be applied evenly but monitored closely to prevent full homogenization.
After cooling, the heart shows a dual-texture effect that highlights contrast. This design is suitable for artistic decor and creative DIY exploration.
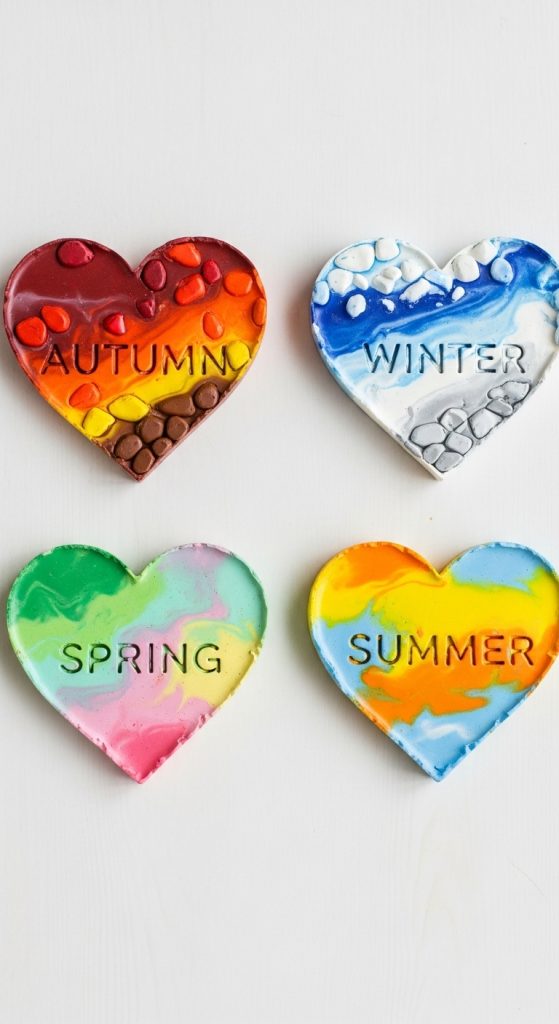
Idea 9: Seasonal Theme Melted Hearts
How to Create
Seasonal melted crayon hearts are designed to reflect specific times of the year using color psychology. This idea is widely used in Pinterest ideas for themed decoration and creative planning. Each heart represents a season through color selection.
For example, warm tones represent autumn, cool tones represent winter, and bright tones represent spring or summer. Crayons are arranged accordingly inside the mold before melting. The heat process blends the seasonal palette into a unified themed design.
Step-by-Step Guide
Color selection is the most important part of this method. Each seasonal palette should remain consistent. Arrangement should support natural blending within the theme.
After cooling, each heart visually represents a season. These can be displayed as a set for organized decorative storytelling in home decor or creative projects.
Idea 10: Layered Transparent Melted Hearts
How to Create
Layered transparent melted crayon hearts aim to create a glass-like visual effect using controlled melting and thin layering techniques. This design is popular in advanced DIY creative ideas because it produces a delicate aesthetic appearance.
Thin layers of crayon are melted one at a time, allowing partial transparency between layers. Each layer is carefully placed to maintain visual clarity. The result is a heart that appears light, layered, and visually soft.
Execution Process
Each layer must be extremely thin to achieve transparency. Heat control is critical to prevent full opacity. Timing between layers ensures structural stability.
After cooling, the heart displays a soft layered glow. It is ideal for decorative arrangements and aesthetic home decor projects.
Common Beginner Mistakes and How to Avoid Them
One common mistake in melted crayon heart projects is overheating the wax, which causes colors to become muddy and lose definition. Another issue is uneven crayon placement, which leads to unbalanced melting patterns. Beginners often also skip workspace protection, resulting in difficult cleanup. Proper planning and controlled heat application are essential for consistent results.
Avoid mixing too many dark colors with light tones unless a blended effect is intended. It is also important to ensure uniform crayon sizes for even melting. Taking time to arrange materials before heating significantly improves final outcomes in DIY creative projects.
Practical Tips for Better Results
Better results in melted crayon hearts come from controlled preparation and patience during melting. Using evenly sized crayon pieces ensures uniform texture. Gradual heating produces smoother blends and prevents sudden color distortion.
Experimenting with color placement before melting helps achieve intentional designs rather than random outcomes. Allowing full cooling time ensures structural stability. These techniques improve consistency in beginner friendly crafts and support more refined aesthetic results.
Styling, Presentation, or Organization Ideas
Melted crayon hearts can be arranged in patterns such as grids, rows, or thematic clusters to enhance visual impact. Grouping similar color styles together creates a cohesive aesthetic display. This approach aligns with modern home decor and minimalist style preferences.
They can also be mounted on boards, arranged in frames, or displayed as part of creative wall decor. Organizing by color theme or seasonal concept improves visual storytelling. This enhances the decorative value of handmade crafts in home environments.
Budget or Time Planning
These DIY projects are budget friendly because crayons are inexpensive and widely available. Most of the cost comes from basic tools, which are minimal. Time investment varies depending on design complexity, but most melted crayon hearts can be completed within a short crafting session.
Simple designs take less time, while layered or textured versions require longer cooling and multiple stages. Planning color arrangement beforehand reduces errors and saves time. This makes the process efficient for both beginners and structured creative projects.
Creative Expansion and Advanced Inspiration
Advanced variations of melted crayon hearts can include combining multiple techniques such as layering and marbling in a single piece. Adding structured patterns or geometric divisions increases complexity and artistic value.
These designs can also be integrated into larger creative projects like wall installations or themed decor sets. Experimenting with unusual color combinations and controlled melting techniques expands artistic possibilities. This supports long-term exploration in DIY creative ideas and modern aesthetic design development.