

Bird bath decoration has become a widely searched topic in Pinterest ideas, especially for outdoor spaces that aim to combine nature, structure, and visual charm. A bird bath is more than a functional garden element. It serves as a focal point that can enhance home decor through thoughtful styling and creative design choices. This topic focuses on practical DIY approaches that transform a simple bird bath into an aesthetic feature using accessible materials and simple techniques. Readers will learn how to style, enhance, and personalize bird baths using step by step methods that suit different garden sizes and design preferences. The ideas in this article focus on beginner friendly methods that require minimal tools while still achieving a modern design effect. Each concept emphasizes balance between decoration and usability, ensuring that birds can still safely use the bath while the visual appeal is improved. This guide provides structured inspiration for creative project planning in outdoor spaces.
Why This Idea Is Trending or Useful
Decorating bird baths has become a trending topic in modern garden inspiration due to its blend of functionality and aesthetic appeal. Many Pinterest ideas now focus on transforming simple outdoor elements into visually engaging features that align with minimalist style and natural home decor trends. A decorated bird bath enhances outdoor organization by creating a focal point that ties together plants, pathways, and seating areas. It also supports DIY culture, as most decoration methods rely on easy project techniques that require limited materials and no advanced skills. This accessibility makes it suitable for beginners who want to experiment with creative ideas without major investment. Additionally, bird bath decoration supports eco friendly garden planning by encouraging wildlife presence while maintaining aesthetic balance. The flexibility of design options allows users to adapt styles according to seasonal changes or personal preference. This combination of practicality, creativity, and affordability explains why the topic continues to grow in popularity across Pinterest inspiration boards.
Materials and Preparation
Preparing for bird bath decoration requires a combination of basic materials, simple tools, and clear planning to ensure a balanced and long lasting design. Common materials include small decorative stones, waterproof paint, mosaic tiles, natural pebbles, and outdoor sealant. Additional decorative elements such as glass beads, ceramic pieces, or natural shells can be used to enhance visual texture. Essential tools include adhesive suitable for outdoor use, a soft brush for cleaning, and protective gloves for safe handling. Before starting, the bird bath must be thoroughly cleaned to remove dirt, algae, or residue that may affect adhesion. Planning is important because the chosen design should not interfere with the functionality of the bird bath. The surface must remain safe and stable for birds, which means avoiding sharp or uneven decorations in water areas. Sketching a simple layout helps organize placement and ensures visual balance. Proper preparation creates a smooth workflow and improves the durability of the final decoration.
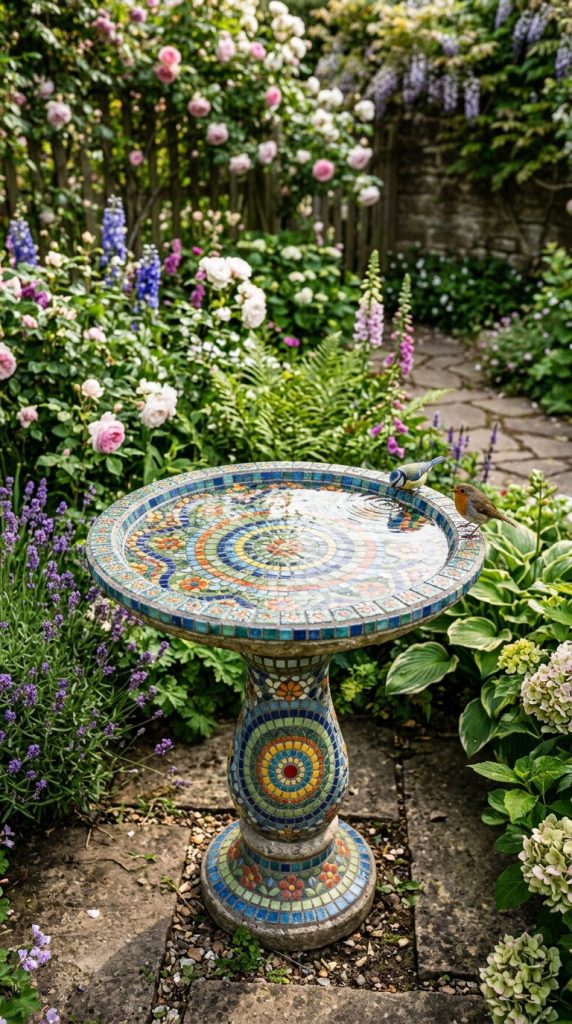
Idea 1: Mosaic Stone Elegance Design
How to Create
Mosaic stone decoration transforms a bird bath into a detailed and textured garden feature using small arranged pieces of stone or tile. This concept focuses on creating structured patterns that reflect light and add depth to the surface. It is widely used in Pinterest ideas due to its timeless aesthetic and compatibility with both modern design and rustic outdoor settings. The mosaic effect allows for creative freedom while maintaining a controlled and organized appearance. It enhances home decor by introducing artistic detail into functional garden elements. The design works well for circular or pedestal bird baths, as the shape naturally supports radial patterns. This method is beginner friendly because it relies on simple placement techniques rather than advanced construction skills. The final result creates a visually engaging centerpiece that blends naturally with plants and outdoor surroundings.
To create this design, start by cleaning and drying the bird bath surface completely. Apply a waterproof adhesive in small sections to prevent drying before placement. Arrange mosaic stones or tiles gradually, following a pre-planned pattern or freeform layout. Maintain even spacing to ensure balance and avoid overcrowding. Once the surface is covered, allow it to dry fully before applying grout or sealant to secure the pieces. Smooth any excess material carefully to maintain a clean finish. After sealing, let the structure cure completely before adding water. This step by step tutorial ensures durability and long term stability while preserving the decorative effect. The process is efficient when done with careful planning and attention to alignment.
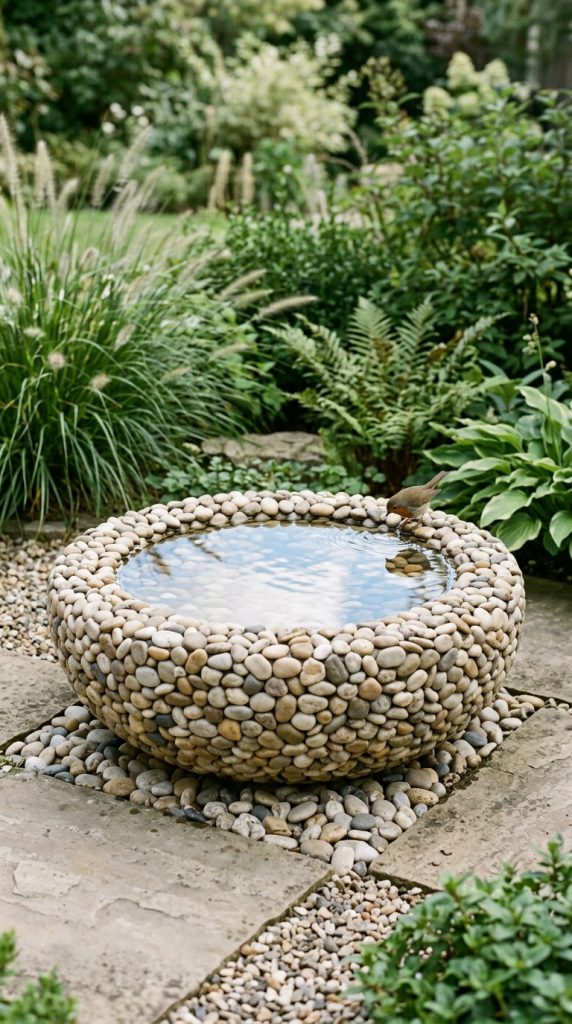
Idea 2: Natural Pebble Minimalist Finish
How to Create
A natural pebble finish focuses on simplicity and organic texture, making it suitable for minimalist style garden setups. This design uses smooth stones in neutral tones to create a calm and balanced surface. It reflects modern design principles that emphasize natural materials and understated beauty. The concept works particularly well in outdoor environments with greenery, as it blends seamlessly with natural surroundings. It also aligns with DIY trends that prioritize easy project execution without complex tools. The arrangement of pebbles introduces subtle variation while maintaining visual consistency. This approach enhances the bird bath without overwhelming its original structure, making it suitable for users who prefer clean and simple decoration ideas.
To create this look, begin by selecting smooth, uniform pebbles and cleaning the bird bath surface thoroughly. Apply a thin layer of waterproof adhesive in sections and press each pebble firmly into place. Maintain consistent spacing or place them closely for a solid surface effect. Work gradually to ensure alignment and stability. Once all pebbles are placed, allow the adhesive to set fully before sealing the surface with a protective outdoor coating. This ensures durability and weather resistance. The process is straightforward and beginner friendly, making it suitable for quick transformation projects. Proper execution results in a natural aesthetic that enhances garden organization and visual harmony.
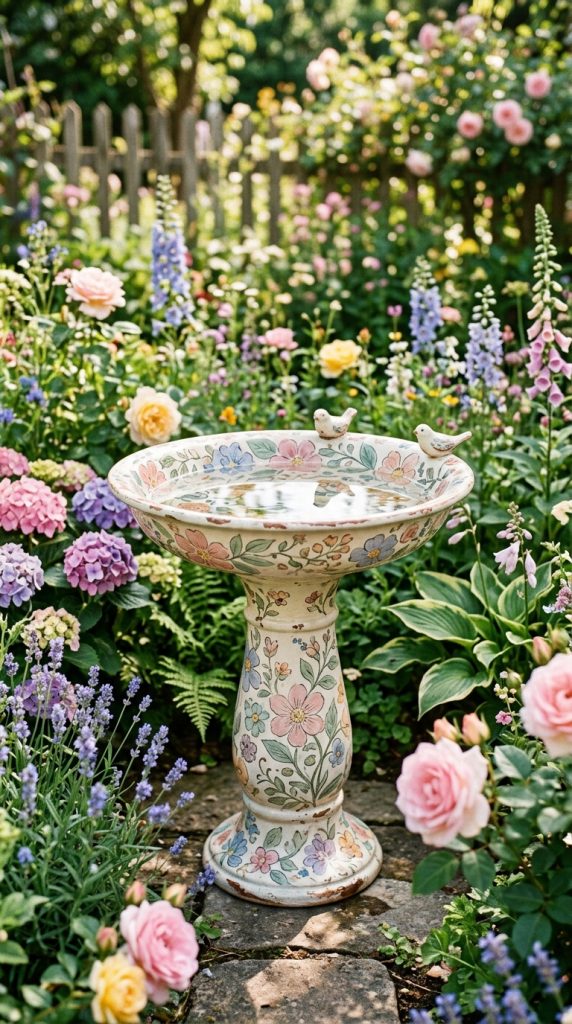
Idea 3: Painted Floral Surface Art
How to Create
Floral painting on a bird bath introduces color and artistic expression while maintaining a structured decorative surface. This design focuses on hand painted patterns such as leaves, petals, or abstract botanical shapes. It is popular in Pinterest inspiration because it allows complete customization and aligns with handmade creative project trends. The floral theme connects strongly with outdoor environments, enhancing the visual relationship between the bird bath and surrounding plants. This method is suitable for individuals seeking budget ideas since it requires minimal materials. It also supports beginner friendly execution because the designs can be simple or detailed depending on skill level. The painted surface creates a soft aesthetic that enhances home decor through color integration and artistic detail.
To create this design, clean and prime the bird bath surface to ensure paint adhesion. Use outdoor safe paint and begin with light sketching of floral patterns using a pencil. Apply base colors first, then layer details gradually using fine brushes. Allow each layer to dry before adding additional elements. Once the painting is complete, apply a weatherproof sealant to protect the artwork from moisture and fading. This step by step process ensures durability and clarity of design. The final result offers a personalized decorative element that enhances outdoor aesthetics.
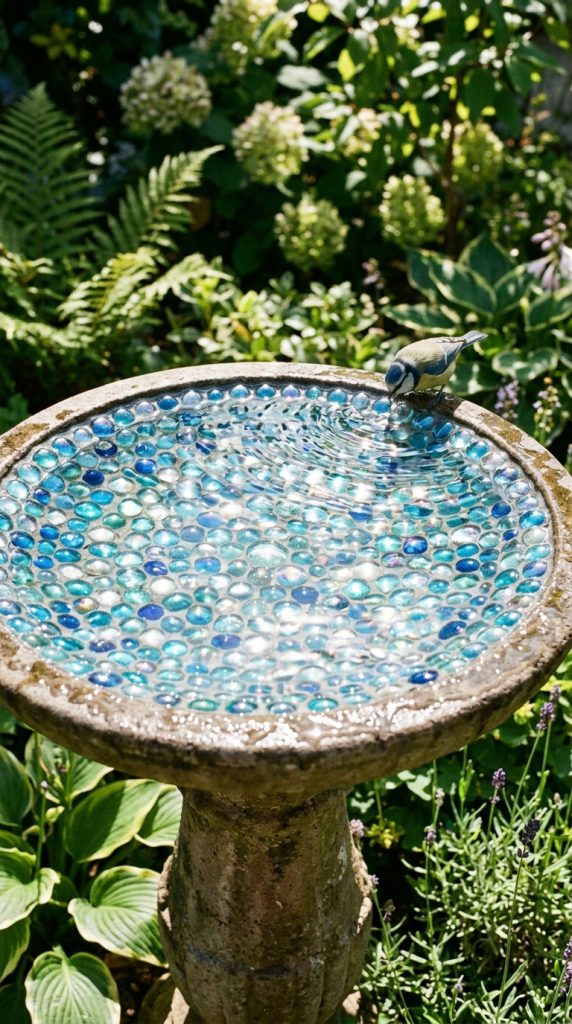
Idea 4: Glass Bead Reflective Surface
How to Create
Glass bead decoration creates a reflective surface that interacts with sunlight, producing subtle shimmer effects throughout the day. This concept focuses on arranging small translucent elements to enhance visual brightness. It is often featured in Pinterest ideas due to its aesthetic appeal and modern design compatibility. The reflective quality adds depth and movement to the bird bath without altering its structure. It works well in minimalist style gardens where light interaction is a key visual element. The design remains simple yet visually impactful, making it suitable for beginner friendly DIY projects.
To create this effect, prepare the surface by cleaning and applying waterproof adhesive in small sections. Place glass beads evenly across the surface, ensuring balanced spacing for light reflection. Work gradually to maintain consistency. After full coverage, allow the adhesive to dry completely before sealing with a transparent protective layer. This ensures stability and weather resistance. The process is simple and efficient, requiring only basic materials and careful placement. The finished result enhances outdoor decoration with subtle reflective beauty.
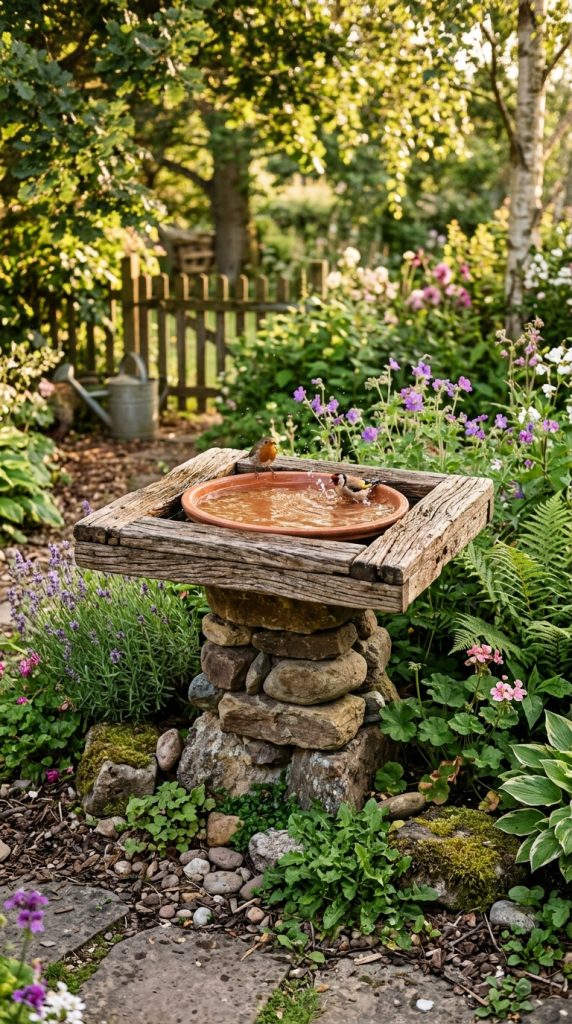
Idea 5: Rustic Wooden Accent Border
How to Create
A rustic wooden accent border introduces natural warmth and structure to a bird bath design. This idea focuses on combining organic wood textures with the existing shape of the bath to create a framed appearance. It is widely used in home decor inspiration due to its earthy and grounded aesthetic. The wooden elements contrast softly with stone or ceramic surfaces, creating visual balance. This design aligns with creative ideas that emphasize natural materials and simple execution. It is suitable for outdoor spaces that follow rustic or garden-themed planning styles.
To create this design, select small treated wooden pieces suitable for outdoor use. Measure the circumference of the bird bath and cut wood pieces accordingly. Attach them securely around the outer rim using waterproof adhesive or fasteners. Ensure even alignment to maintain symmetry. Once installed, apply a protective coating to prevent weather damage. Allow the structure to set completely before use. This step by step method ensures durability and a clean finish while enhancing the overall garden aesthetic.
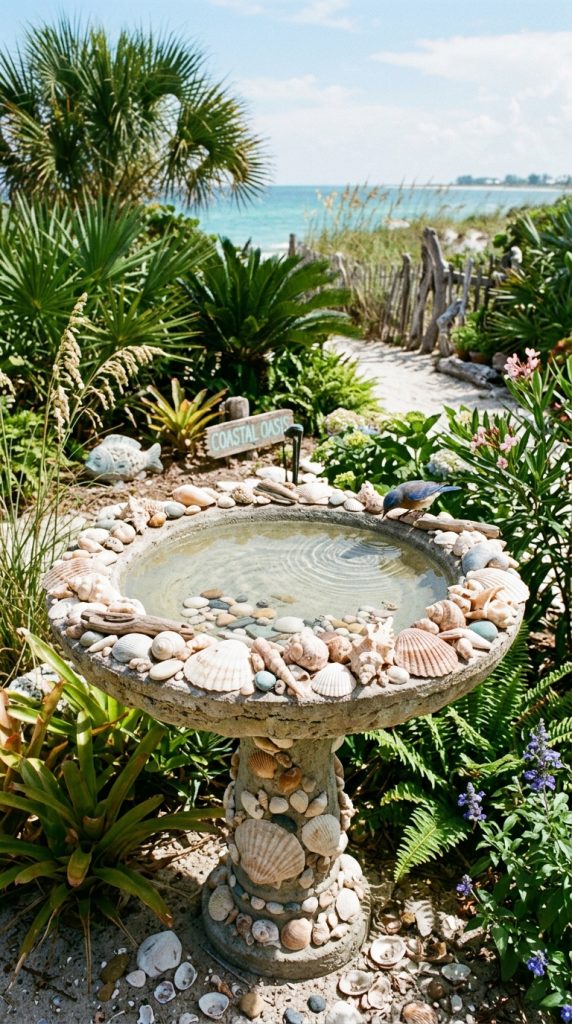
Idea 6: Shell-Inspired Coastal Theme
How to Create
A coastal shell theme introduces beach inspired decoration using natural shells and light tones. This concept focuses on creating a soft, coastal aesthetic that brings seasonal variation into garden design. It is popular in Pinterest inspiration due to its relaxing visual appeal and compatibility with outdoor environments. The use of shells adds texture and uniqueness, making each design slightly different. This idea works well for users seeking creative project options that feel natural and artistic.
To create this design, clean the bird bath surface and gather assorted shells. Apply adhesive in sections and arrange shells in patterns or scattered layouts. Maintain balance between density and open space. Once placement is complete, allow full drying time before sealing. A protective coating ensures durability and water resistance. This method is simple and suitable for beginners while offering a visually distinct final result.
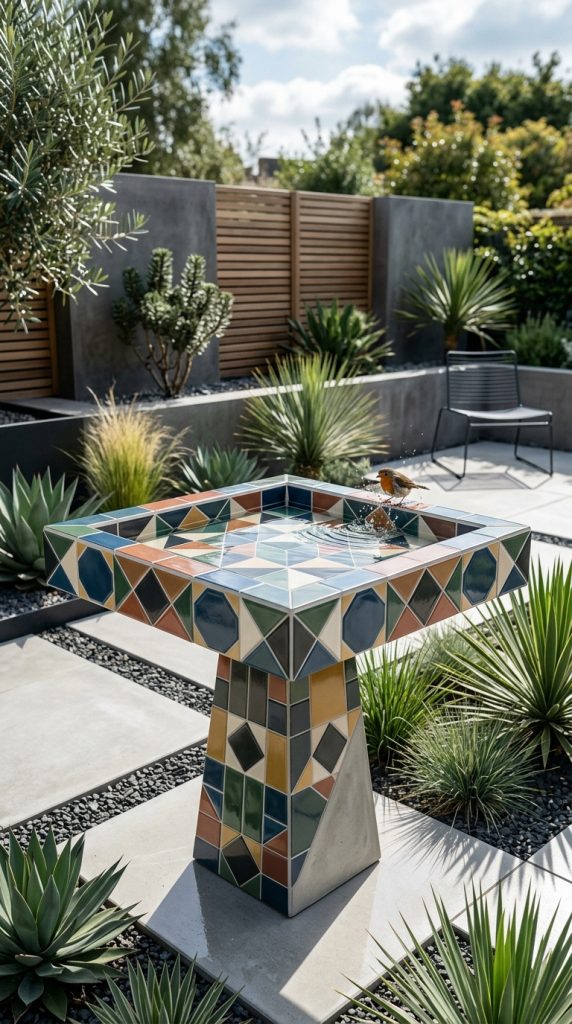
Idea 7: Geometric Tile Pattern Structure
How to Create
Geometric tile patterns introduce structured visual design using repeated shapes and aligned layouts. This concept aligns with modern design trends that emphasize order and symmetry. It is commonly featured in Pinterest ideas due to its clean and organized appearance. The geometric structure enhances the bird bath by adding architectural detail. This approach is suitable for users who prefer controlled and precise decoration styles.
To create this design, select uniform tiles and plan a geometric layout. Apply adhesive evenly and place tiles according to the pattern. Ensure consistent spacing for visual accuracy. After full placement, allow drying before sealing with grout or protective coating. This ensures stability and long term durability. The step by step process results in a polished and structured finish.
Idea 8: Color Gradient Painted Layers
How to Create
A gradient paint design introduces smooth color transitions that enhance visual depth. This concept focuses on blending shades gradually across the surface. It is widely used in modern design inspiration due to its soft aesthetic and artistic appeal. The gradient effect creates a dynamic appearance that changes subtly with lighting conditions. This method is beginner friendly and requires only basic painting tools.
To create this design, apply a base coat and divide the surface into sections. Blend colors using a sponge or brush while the paint is still wet. Work gradually to achieve smooth transitions. Once dry, apply a protective sealant. The result is a visually fluid design that enhances outdoor decoration.

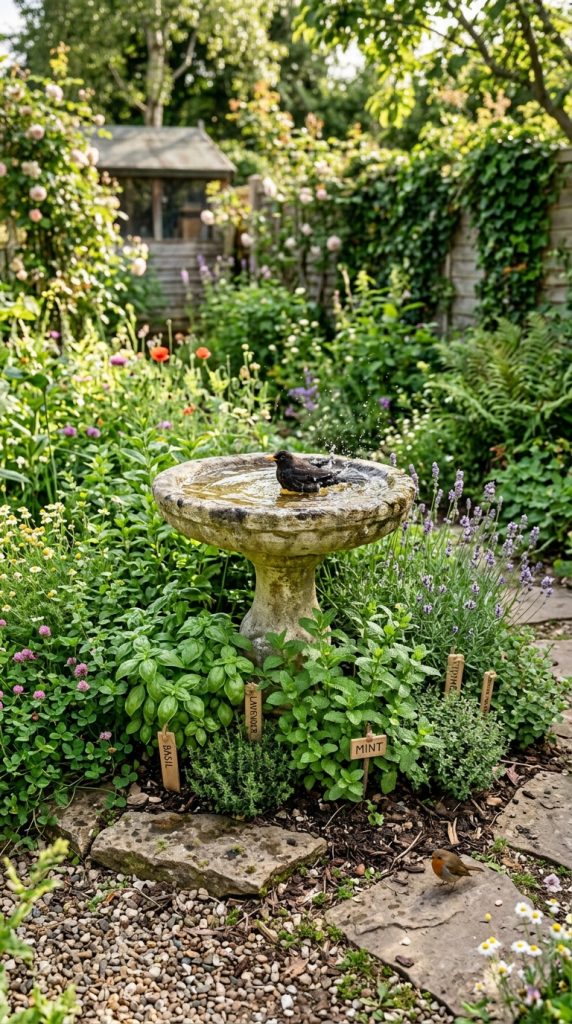
Idea 9: Herb-Integrated Decorative Edge
How to Create
This idea incorporates small herb plants around the bird bath edge to combine decoration with natural growth. It aligns with garden organization concepts that merge functionality with aesthetics. The greenery enhances visual freshness and supports eco friendly design approaches.
To create this setup, install small planting holders around the base. Add soil and plant herbs suitable for outdoor conditions. Maintain spacing for growth and stability. Water regularly while ensuring the bird bath remains accessible. This method integrates living elements into decorative design.
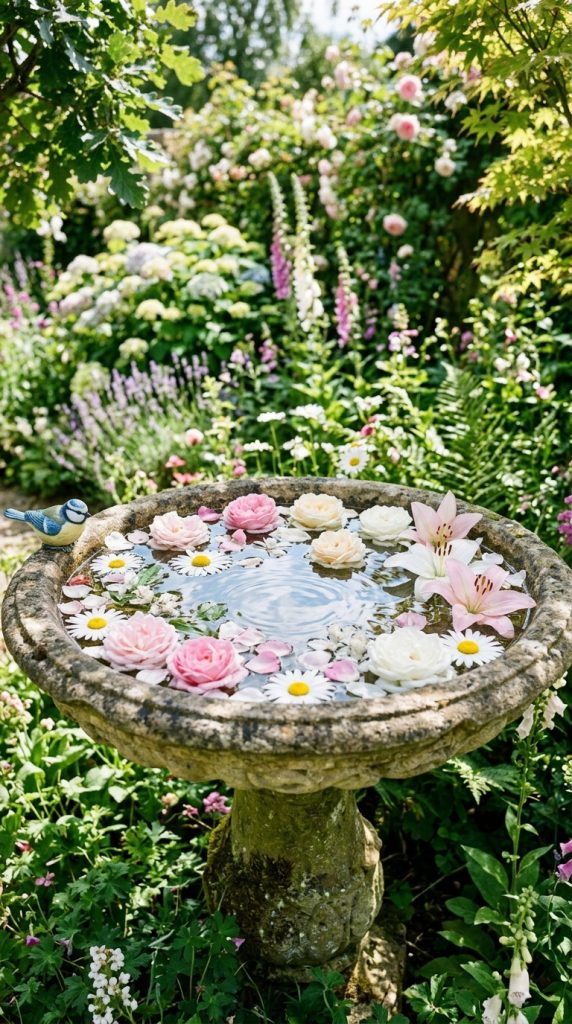
Idea 10: Floating Floral Arrangement Surface
How to Create
A floating floral arrangement uses water-safe flowers to create seasonal decoration. This design focuses on temporary, natural beauty that changes regularly. It is popular in Pinterest inspiration due to its simplicity and visual impact.
To create this effect, fill the bird bath with clean water and place fresh flowers on the surface. Choose lightweight blooms that float easily. Replace regularly to maintain freshness. This method requires minimal effort and enhances outdoor aesthetics instantly.
Common Beginner Mistakes and How to Avoid Them
A frequent mistake in bird bath decoration is using non-waterproof materials that degrade quickly when exposed to moisture. Another issue is overcrowding the surface, which can reduce both aesthetic balance and usability for birds. Beginners also often skip proper surface preparation, leading to weak adhesion and uneven results. To avoid these issues, it is important to choose outdoor-safe materials, maintain balanced spacing, and follow proper cleaning steps before starting. Planning each design in advance ensures better structure and prevents unnecessary corrections during execution. Careful material selection and step by step application improve durability and visual quality significantly.
Practical Tips for Better Results
Achieving high-quality results requires attention to surface preparation, material compatibility, and consistent application techniques. Using lightweight decorative elements helps maintain balance and prevents structural strain. Working in controlled sections allows better alignment and reduces errors. Choosing neutral or natural tones often improves integration with outdoor environments. Allowing adequate drying time between steps ensures long-lasting durability. These practical adjustments improve both visual appeal and functional stability.
Styling, Presentation, or Organization Ideas
Bird bath styling should complement surrounding garden elements to create a cohesive outdoor environment. Positioning near plants or pathways enhances visibility and visual flow. Using consistent color themes across garden decor improves overall organization. Incorporating subtle lighting nearby can highlight decorative details during evening hours. Maintaining a clean surrounding area ensures that the bird bath remains the focal point. These strategies enhance presentation and support balanced outdoor design.
Budget or Time Planning
Bird bath decoration can be completed efficiently with minimal budget when using simple materials such as stones, paint, or natural elements. Planning each step in advance reduces time spent on adjustments. Most designs can be completed within a few hours to a day depending on drying time. Using readily available materials helps control cost while maintaining creative flexibility. Structured planning ensures smooth execution without delays.
Creative Expansion and Advanced Inspiration
Advanced bird bath decoration can include layered mosaics, mixed-material combinations, or seasonal design changes. Incorporating lighting elements or sculptural accents adds depth and uniqueness. Experimenting with asymmetrical layouts or thematic designs enhances creative variation. These expansions allow users to develop more personalized and artistic outdoor features while maintaining functional balance.