Creating a bird bath from affordable materials has become one of the most popular Pinterest ideas for outdoor decoration and garden organization. DIY bird baths made from dollar-store supplies combine creativity, functionality, and budget-friendly planning in a way that appeals to both beginners and experienced crafters. These easy project ideas allow homeowners, apartment residents, and garden enthusiasts to add aesthetic outdoor features without expensive materials or complicated construction methods. A handmade bird bath also encourages birds to visit outdoor spaces, which helps create a lively and peaceful environment around patios, balconies, porches, and backyard gardens.
This article explains how to create ten unique DIY bird bath designs using simple materials commonly available at discount craft and home stores. Each tutorial includes practical step by step instructions, preparation guidance, and creative ideas for styling the finished project. Readers will learn how to combine bowls, planters, candle holders, trays, and decorative items into functional bird baths with modern design appeal. The article also covers important beginner-friendly information about preparation, maintenance, budgeting, and outdoor presentation. These trending ideas offer inspiration for seasonal decoration, minimalist style landscaping, and creative outdoor organization while remaining accessible for nearly any skill level or budget.
Why This Idea Is Trending or Useful
DIY bird bath projects continue to gain popularity because they provide a combination of practical outdoor use and aesthetic decoration at a very low cost. Pinterest inspiration frequently highlights projects that transform inexpensive household items into attractive home decor pieces, and bird baths fit perfectly within that creative trend. These projects are especially useful because they allow people to personalize outdoor spaces without requiring advanced tools or construction experience. The materials are accessible, the setup methods are beginner friendly, and the final result adds visual interest to gardens, patios, balconies, and small outdoor corners.
Another reason these creative ideas are trending is their compatibility with modern design preferences. Many people now prefer minimalist style outdoor decor with handmade elements that feel natural and functional rather than overly decorative. Dollar-store bird bath tutorials support this trend because they can be customized using neutral colors, textured finishes, mosaic decoration, or rustic materials depending on the desired aesthetic. These projects also appeal to people interested in sustainable DIY methods because they often involve repurposing or reusing common household objects. The accessibility of the materials and the simplicity of the planning process make these bird bath ideas practical for renters, homeowners, and anyone searching for budget ideas that improve outdoor organization and decoration without requiring major renovations.
Materials and Preparation
Before starting any DIY bird bath project, it is important to gather all materials and prepare the workspace carefully. Most Dollar Tree bird bath projects use lightweight items such as plastic bowls, terracotta-style planters, serving trays, glass candle holders, decorative stones, adhesive glue, waterproof sealant, and outdoor paint. Basic tools may include a hot glue gun, construction adhesive, measuring tape, paintbrushes, sandpaper, and protective gloves. Choosing weather-resistant materials improves durability and helps the finished bird bath remain stable during outdoor use. When selecting bowls or trays, shallow designs work best because birds prefer easy access to water with safe standing areas around the edges.
Preparation also involves planning the location and structure of the bird bath before assembly begins. The project should be placed on level ground or a stable outdoor surface to prevent tipping. It is also useful to consider nearby shade, drainage, and visibility from windows or seating areas. Cleaning all materials before construction helps adhesives bond properly and creates a smoother final appearance. If painting is part of the project, outdoor-safe paint and sealant should be applied before final assembly to allow proper drying time. Planning color schemes, decorative accents, and height variations in advance helps create a more organized and visually balanced finished project that complements existing home decor and outdoor landscaping.
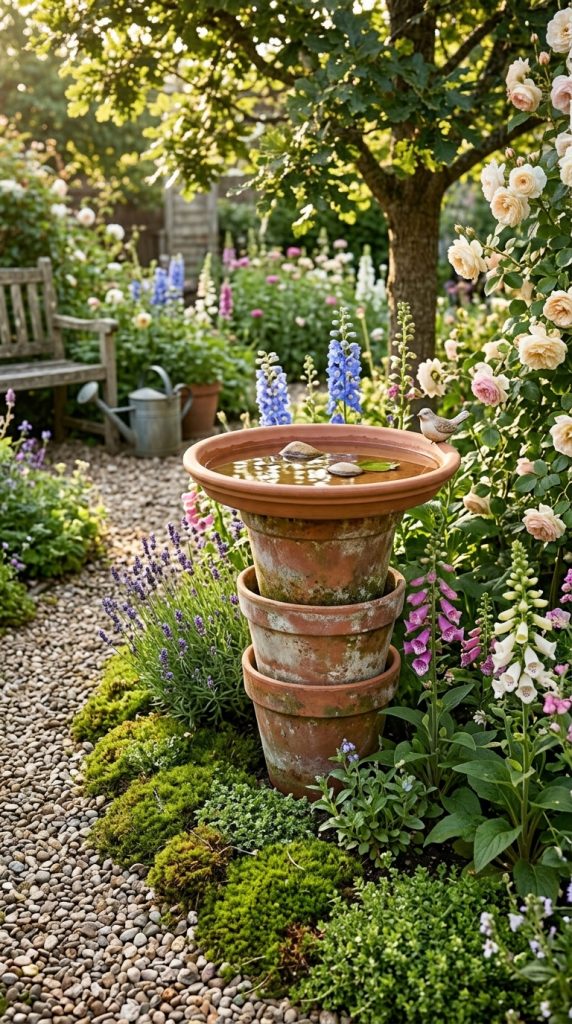
Idea 1: Stacked Planter Bird Bath
How to Create
A stacked planter bird bath is one of the most beginner friendly DIY outdoor projects because it combines simple materials with a balanced vertical structure. This design usually uses two plastic planters turned upside down to create the base and a shallow bowl placed on top to hold water. The layered arrangement creates height, which improves visibility for birds and enhances the decorative effect within garden spaces. This type of handmade bird bath works especially well in minimalist style landscaping because the clean lines and symmetrical structure create a modern design appearance without requiring complex decoration. Neutral paint colors such as white, gray, beige, or matte black help the project blend naturally with outdoor furniture and garden organization themes.
The preparation process begins by cleaning the planters thoroughly and sanding any glossy surfaces to improve paint adhesion. Outdoor paint should be applied evenly in thin layers and sealed with waterproof coating after drying. The larger planter forms the bottom foundation, while the smaller planter is glued securely on top using weather-resistant adhesive. After the structure becomes stable, a shallow serving bowl or plastic tray is attached to the top as the water basin. Decorative stones can be added around the base to improve balance and presentation. This step by step tutorial works well for patios, entryways, and small garden corners because the compact design requires limited space while still creating strong visual impact and practical functionality for birds.
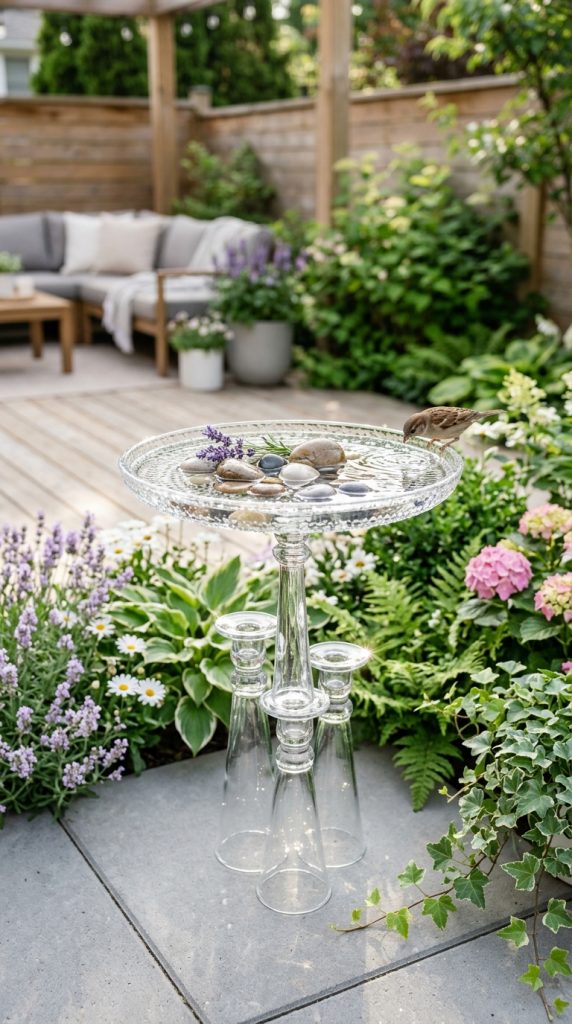
Idea 2: Glass Candle Holder Bird Bath
Step-by-Step Guide
A glass candle holder bird bath creates an elegant outdoor decoration with reflective surfaces and lightweight construction. This project combines clear glass candle holders with a shallow glass plate or decorative tray to create a sophisticated aesthetic suitable for balconies, porches, and flower gardens. The transparent structure reflects sunlight and surrounding greenery, which gives the finished project a clean and modern appearance. Pinterest ideas often feature this style because it looks decorative while remaining simple to assemble. The design also supports creative customization through colored stones, mosaic accents, or painted glass finishes that coordinate with existing home decor themes.
The execution process begins by selecting a strong candle holder with a wide enough base to support the top tray securely. Both surfaces should be cleaned thoroughly before adhesive application. Waterproof construction glue works best because it creates a durable connection between glass pieces. The candle holder is positioned upside down to form the pedestal, and the shallow tray is centered carefully on top. Once the adhesive cures completely, decorative filler such as smooth pebbles or marbles can be placed inside the tray to help birds stand safely while drinking. This easy project requires minimal tools and can usually be completed within one afternoon. Positioning the finished bird bath near flowering plants or climbing vines improves the overall aesthetic while creating a welcoming environment for small birds.
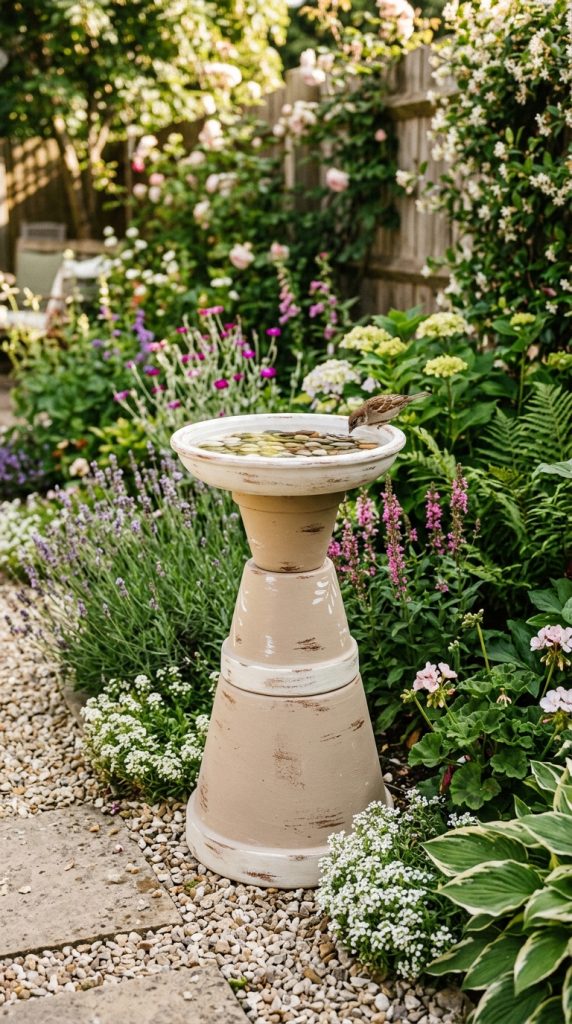
Idea 3: Rustic Clay Pot Bird Bath
How to Make
A rustic clay pot bird bath creates a natural outdoor appearance that blends easily with gardens and farmhouse-inspired decoration styles. This DIY project uses terracotta-style pots and saucers arranged into a stable pedestal structure with earthy textures and warm colors. The rough finish of clay materials provides a traditional aesthetic that complements flowers, gravel paths, wooden fences, and other rustic home decor elements. Pinterest inspiration frequently highlights this design because it balances simplicity with handmade charm. The clay surfaces can remain natural for an organic look or be painted lightly with muted tones for a more modern design effect.
The setup method begins by selecting one large clay pot for the base and a matching saucer for the water bowl. Smaller clay pots can also be stacked upside down to increase height while maintaining balance. Before assembly, all pieces should be cleaned and sealed with waterproof outdoor coating to reduce moisture damage over time. Construction adhesive is applied between each stacked section to stabilize the structure securely. Once assembled, the saucer is attached carefully at the top and filled with shallow water and small stones. Decorative moss, gravel, or surrounding potted plants can be added around the base to improve the presentation. This beginner friendly project works especially well in cottage gardens and outdoor relaxation spaces because the natural materials help the bird bath blend seamlessly into surrounding landscaping and decorative organization themes.
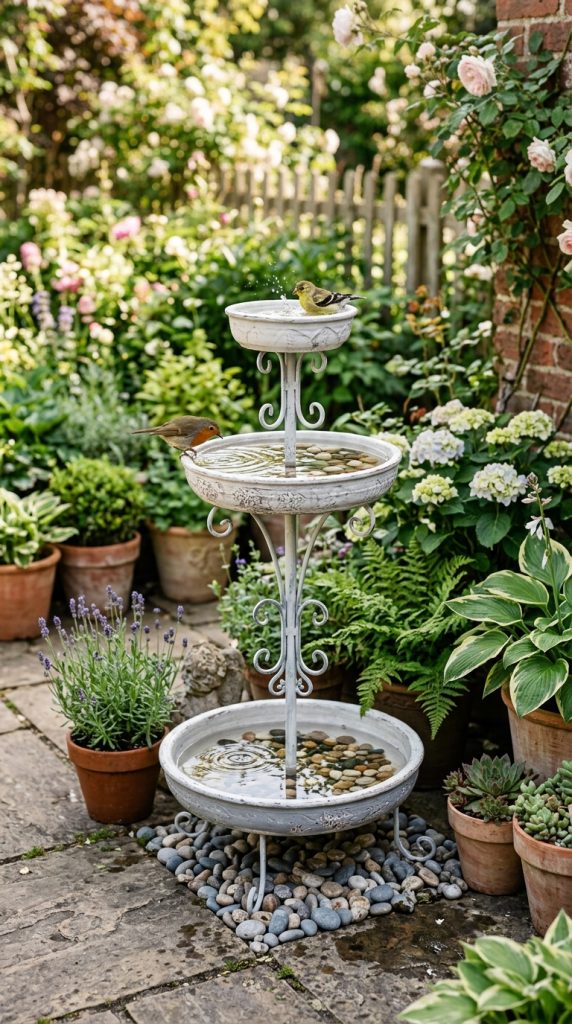
Idea 4: Tiered Serving Tray Bird Bath
Execution Process
A tiered serving tray bird bath offers a decorative alternative to traditional single-level bird baths by introducing layered visual structure and multiple resting areas for birds. This design uses metal or plastic serving trays arranged vertically using candle holders, bowls, or short pedestal pieces between each layer. The finished structure resembles decorative dessert stands commonly seen in home decor styling, but it functions as a practical outdoor water feature. This creative project is popular in Pinterest inspiration collections because it combines organization, symmetry, and aesthetic appeal in a compact footprint suitable for patios and balconies.
The practical process begins with selecting trays in gradually decreasing sizes to create balanced layering. The largest tray forms the bottom tier, while smaller trays are attached above using waterproof adhesive and supportive pedestal components. It is important to measure carefully so the structure remains centered and stable. Outdoor paint can be applied before assembly to create a consistent color palette that matches nearby decoration themes. Once assembled, shallow water should be added only to the top tray while lower levels can contain decorative stones, moss, or artificial greenery for visual balance. Small pebbles placed inside the water basin improve bird safety by creating textured standing surfaces. This step by step tutorial is especially useful for compact outdoor spaces because the vertical arrangement saves room while still creating a strong decorative focal point with modern design appeal.
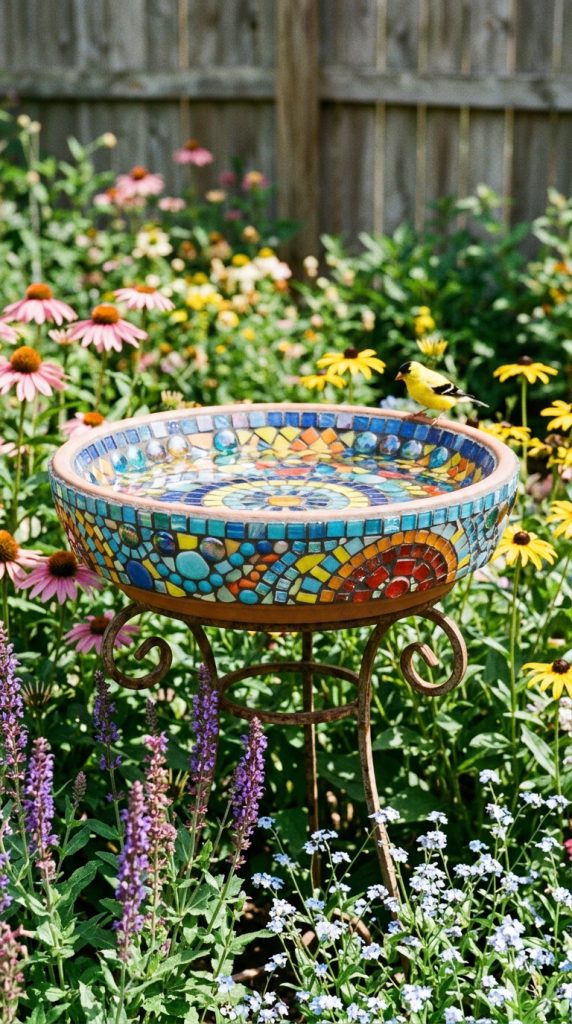
Idea 5: Mosaic Bowl Bird Bath
How to Create
A mosaic bowl bird bath introduces color, texture, and artistic detail into outdoor spaces while remaining practical and beginner friendly. This DIY tutorial uses a shallow plastic or glass bowl as the main basin and decorates the outer surfaces with mosaic tiles, glass gems, or broken ceramic pieces arranged into patterns. The finished project creates a vibrant handmade appearance that reflects sunlight beautifully and enhances garden decoration. Pinterest ideas frequently feature mosaic projects because they allow unlimited customization while still using affordable materials. This bird bath style works especially well in colorful flower gardens or artistic patio settings where decorative details play a central role in the overall aesthetic.
The creation process begins by selecting a shallow bowl with smooth outer surfaces suitable for attaching decorative pieces. Mosaic materials should be organized by color and size before gluing to simplify the planning stage. Waterproof adhesive is applied in small sections while tiles or glass pieces are pressed firmly into place. After drying, grout is spread carefully between the decorative elements to secure the design and create a finished appearance. The entire bowl should then be sealed using outdoor-safe waterproof coating to protect against weather exposure. The bowl can be mounted onto an upside-down planter, pedestal stand, or stack of bricks depending on the desired height. Decorative gravel surrounding the base helps integrate the bird bath into outdoor landscaping. This creative idea combines artistic inspiration with practical outdoor functionality while remaining accessible for beginners interested in aesthetic DIY decoration projects.
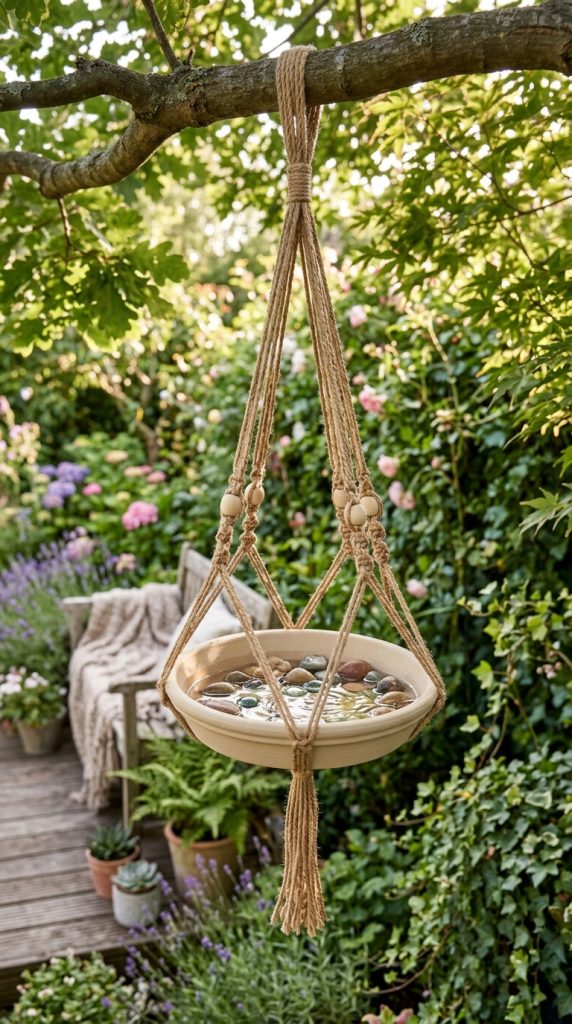
Idea 6: Hanging Bird Bath Station
Setup Method
A hanging bird bath station creates a lightweight and space-saving solution for balconies, porches, and small gardens where ground space may be limited. This design typically uses a shallow bowl suspended with rope, chains, or macrame cord from a sturdy hook or tree branch. The floating appearance gives the project a decorative and airy quality that complements modern outdoor organization and minimalist style landscaping. Pinterest tutorials often feature hanging bird baths because they combine practical function with visual elegance while requiring very few materials. The suspended structure also protects the basin from some ground debris and creates a unique focal point within outdoor seating areas.
The practical setup process begins by selecting a lightweight bowl with evenly balanced edges. Holes are drilled carefully around the rim, or strong adhesive hooks are attached depending on the material type. Rope or chain lengths should be measured evenly to maintain level positioning once the bird bath is suspended. Waterproof knots or metal connectors help improve durability during outdoor use. Decorative beads, painted rope, or wrapped cord can be added to enhance the handmade appearance without affecting functionality. The hanging station should be positioned in partial shade to keep water cooler and reduce evaporation. Small stones placed inside the bowl provide birds with safe footing. This easy project is ideal for renters or homeowners seeking budget ideas that require minimal permanent installation while still adding attractive outdoor decoration and practical wildlife support.
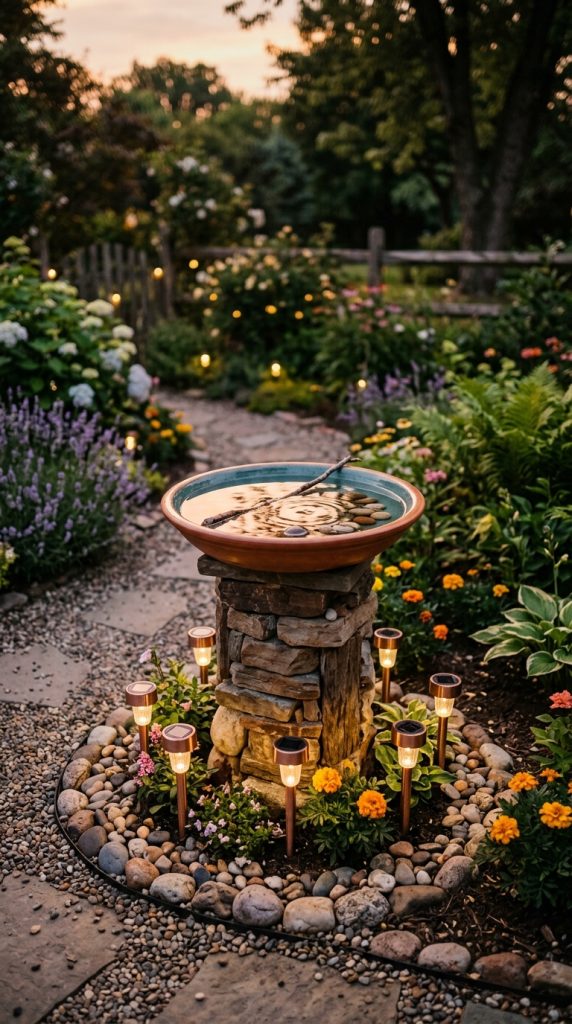
Idea 7: Solar Light Base Bird Bath
How to Make
A solar light base bird bath combines functional lighting with decorative outdoor design by using inexpensive solar garden lights as part of the pedestal structure. This creative idea transforms ordinary outdoor accessories into an illuminated centerpiece that remains visually attractive during both daytime and evening hours. Pinterest inspiration frequently highlights projects that combine multiple functions into one aesthetic feature, and this bird bath design fits perfectly within that trend. The addition of solar lighting creates a soft nighttime glow around patios, walkways, and garden beds while maintaining the practical purpose of attracting birds during the day.
The construction process begins with arranging several solar lights around the perimeter of a sturdy planter or bucket that forms the central support column. Waterproof adhesive secures the lights in position while ensuring the solar panels remain exposed to sunlight. A shallow bowl or serving tray is attached securely at the top using outdoor construction glue. Neutral spray paint can be applied to unify the appearance of different materials and create a cleaner modern design effect. Decorative stones or mulch around the base help conceal structural elements while improving overall presentation. During evening hours, the solar lights create subtle illumination beneath the water basin, which enhances the decorative atmosphere of the surrounding outdoor space. This beginner friendly project works well for people interested in creative ideas that combine practical lighting, handmade decoration, and budget-friendly DIY planning within a single outdoor feature.
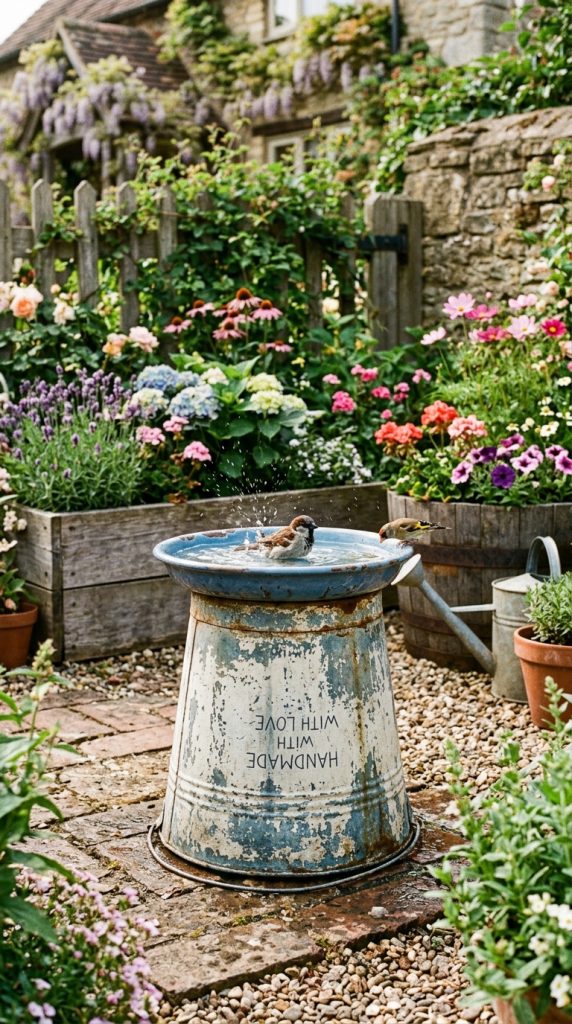
Idea 8: Farmhouse Bucket Bird Bath
Step-by-Step Guide
A farmhouse bucket bird bath creates a rustic and practical outdoor decoration inspired by traditional garden accessories and vintage home decor trends. This project typically uses a metal bucket turned upside down as the pedestal base with a shallow basin attached on top. The simple structure creates strong visual contrast between industrial textures and natural garden surroundings. Pinterest ideas often feature farmhouse-inspired DIY projects because they combine durability, functionality, and timeless aesthetic appeal. This bird bath design works particularly well alongside wooden planters, gravel pathways, and cottage-style landscaping themes.
The step by step process begins by cleaning and sanding the bucket surface to remove dirt or glossy coating. Outdoor paint can be applied lightly to create distressed finishes or muted neutral tones that enhance the farmhouse appearance. Once dry, the bucket is positioned upside down on level ground to create the support base. A shallow tray, serving bowl, or terracotta saucer is attached securely using weather-resistant adhesive. Small drainage stones placed inside the basin help birds stand comfortably while drinking or bathing. Decorative accessories such as wrapped rope, artificial greenery, or surrounding flower pots can be arranged around the base to complete the presentation. This easy project requires very few materials and can be customized according to different outdoor decoration styles. The sturdy structure also makes it suitable for windy outdoor areas where lightweight bird bath designs may become unstable over time.
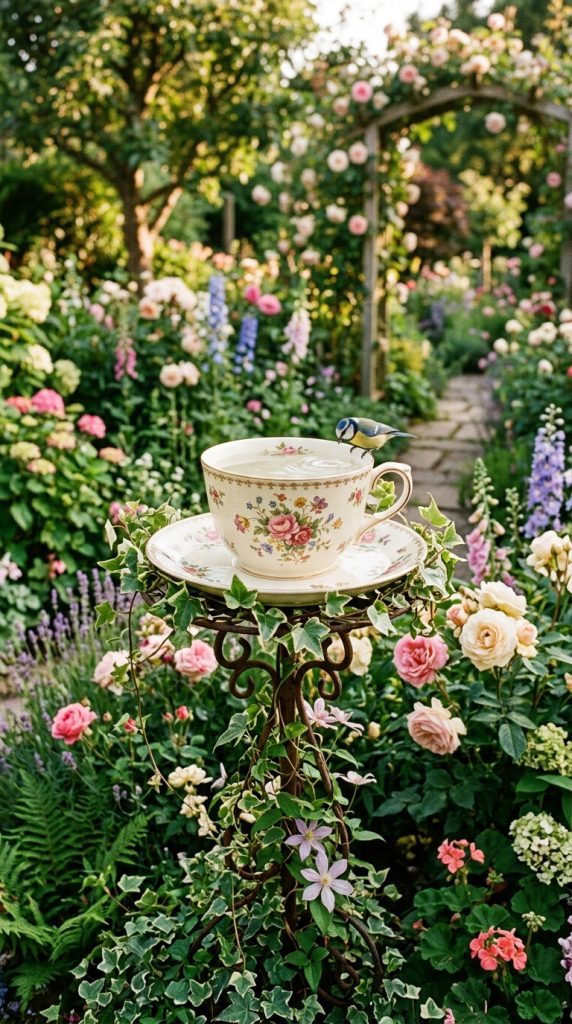
Idea 9: Teacup Garden Bird Bath
How to Create
A teacup garden bird bath introduces delicate decorative detail into outdoor spaces through the use of oversized cups, saucers, or decorative dishware arranged into miniature water features. This handmade project creates a whimsical and aesthetic focal point suitable for small patios, flower gardens, and balcony corners. Pinterest inspiration collections frequently include teacup-themed DIY decoration because the soft curves and layered dishware designs create charming visual interest without overwhelming the surrounding landscape. The compact size also makes this bird bath ideal for limited outdoor spaces or decorative tabletop arrangements.
The execution process begins by selecting durable cups and saucers large enough to hold shallow water safely. Vintage-inspired dishware patterns or solid minimalist colors both work well depending on the desired aesthetic. Waterproof adhesive secures the cup upside down onto a small planter, candle holder, or decorative stand to form the pedestal base. The saucer is then attached carefully at the top to create the water basin. Once fully cured, the structure can be painted or sealed for additional weather resistance. Small glass stones or pebbles inside the basin improve stability for visiting birds while adding decorative texture. Surrounding the project with flowers, ivy, or miniature garden accessories helps integrate the bird bath naturally into outdoor organization themes. This beginner friendly tutorial demonstrates how simple household-inspired materials can become functional outdoor decoration through creative planning and thoughtful assembly methods.
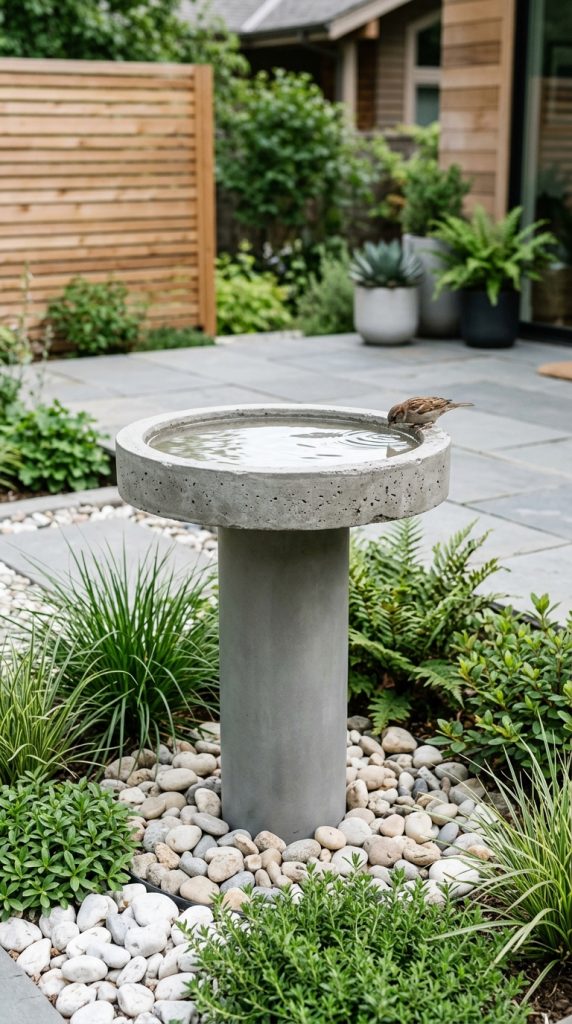
Idea 10: Minimalist Concrete-Look Bird Bath
Execution Process
A minimalist concrete-look bird bath creates a sleek and modern outdoor feature inspired by contemporary landscaping trends and neutral home decor aesthetics. This project uses lightweight plastic bowls and planters coated with textured paint techniques that imitate the appearance of concrete without requiring heavy construction materials. Pinterest ideas often feature concrete-inspired decoration because the neutral surfaces complement modern design styles while maintaining clean visual simplicity. This bird bath style works especially well in minimalist gardens, geometric patio layouts, and organized outdoor seating areas with muted color palettes.
The creation process begins by selecting sturdy plastic bowls and pedestal components with smooth surfaces. After cleaning thoroughly, textured spray paint or layered gray paint techniques are applied to imitate realistic concrete finishes. Light sanding between coats helps create natural texture variation that improves the handmade appearance. Once dry, the pedestal sections are glued securely together using waterproof construction adhesive. A shallow bowl is attached at the top to hold water safely. Decorative gravel, large stones, or simple greenery surrounding the base help reinforce the minimalist aesthetic without overcrowding the design. The finished bird bath should be positioned in an uncluttered outdoor area where its clean lines and neutral colors remain visually noticeable. This creative project offers a modern alternative to highly decorative bird bath styles while remaining affordable, beginner friendly, and practical for contemporary outdoor organization and decoration planning.
Common Beginner Mistakes and How to Avoid Them
One of the most common beginner mistakes in DIY bird bath projects is choosing unstable materials or assembling components without proper balance testing. Lightweight bowls combined with narrow pedestal bases often tip over when exposed to wind, uneven ground, or movement from birds. To avoid this issue, it is important to test stability during the planning stage and use wider bases whenever possible. Another frequent mistake involves using adhesives that are not waterproof or weather resistant. Indoor glue weakens quickly outdoors, especially when exposed to rain and direct sunlight. Selecting outdoor-safe construction adhesive significantly improves durability and prevents structural separation over time.
Another issue beginners encounter is creating water basins that are too deep for birds to use comfortably. Birds prefer shallow water with textured standing areas rather than deep containers. Adding stones or pebbles inside the basin improves safety and accessibility. Poor placement is also a common problem. Bird baths positioned in direct sunlight may overheat quickly, while locations near dense hiding spots can increase risk from predators. Partial shade with nearby visibility works best. Many beginners also skip waterproof sealant during preparation, which shortens the lifespan of painted surfaces and decorative finishes. Careful planning, balanced construction, and weather-resistant materials help create longer-lasting and more functional DIY bird bath projects.
Practical Tips for Better Results
Improving the overall quality of a DIY bird bath often depends on careful preparation and thoughtful outdoor placement rather than expensive materials. One practical tip is to use layered textures within the water basin. Smooth bowls may become slippery, so adding flat stones or gravel creates safer standing surfaces for birds while improving the visual presentation. Another useful technique involves applying multiple thin paint layers instead of one thick coat. Thin layers dry more evenly, reduce visible streaks, and create stronger weather resistance when combined with outdoor sealant. Proper drying time between steps also improves the durability of handmade finishes.
Water maintenance is equally important for long-term results. Shallow water should be changed regularly to prevent debris buildup and maintain a clean environment for birds. Positioning the bird bath near plants or flowers creates a more natural appearance, but excessive leaf coverage should be avoided because it increases cleaning requirements. Adding decorative landscaping around the base helps integrate the project into surrounding outdoor organization themes while improving stability. Neutral color palettes often work best for modern design aesthetics, while textured finishes help conceal outdoor wear over time. Testing the bird bath outdoors before final decoration allows adjustments to height, placement, and balance. These practical planning methods help transform simple budget ideas into polished outdoor decoration projects with strong aesthetic and functional value.
Styling, Presentation, or Organization Ideas
The presentation of a DIY bird bath plays an important role in how effectively it enhances outdoor decoration and landscaping organization. Positioning the bird bath within a visually balanced arrangement creates stronger aesthetic impact than placing it alone in an empty area. One effective styling method involves surrounding the bird bath with layered planters containing flowers, grasses, or low greenery. This creates natural framing while helping the project blend into the surrounding environment. Gravel pathways, decorative stones, or mulch around the base also improve presentation by defining the area and creating a cleaner outdoor layout.
Color coordination is another useful design strategy. Matching the bird bath finish with patio furniture, garden containers, or nearby home decor elements creates a more organized and intentional appearance. Minimalist style spaces often benefit from neutral shades and clean shapes, while cottage-inspired gardens may look better with textured finishes and rustic decoration. Height variation also improves visual balance. Combining bird baths with taller planters, lanterns, or trellises creates layered outdoor organization that feels more dynamic and complete. Seasonal styling can also refresh the project throughout the year. Decorative stones, surrounding flowers, or small garden accessories can be updated according to changing seasons while keeping the main structure unchanged. Thoughtful presentation transforms a simple DIY project into a polished decorative focal point that complements the entire outdoor space.
Budget or Time Planning
Proper planning helps DIY bird bath projects remain affordable and manageable, especially for beginners working with limited time or materials. One effective budgeting strategy involves choosing multi-purpose materials that can serve both structural and decorative functions. Planters, trays, bowls, and candle holders are often inexpensive and can be combined creatively without requiring specialized tools or advanced construction methods. Buying materials in coordinated color palettes also reduces the need for additional paint or decoration later in the process. Many projects can be completed using leftover household items combined with a few affordable supplies, which makes these bird bath ideas practical for low-cost outdoor improvement planning.
Time management is equally important for achieving smooth project execution. Most beginner friendly bird bath tutorials can be completed within a single weekend when preparation steps are organized in advance. Separating the process into stages improves efficiency. Cleaning and sanding materials should be completed first, followed by painting and drying time before final assembly begins. Weather conditions should also be considered because humidity and rain can delay paint curing or adhesive strength. Preparing all tools and decorative materials before starting prevents interruptions during construction. Simple designs with fewer structural layers generally require less drying time and lower maintenance after installation. Careful planning allows these creative projects to remain accessible and enjoyable without becoming overwhelming or unnecessarily expensive for beginners interested in outdoor DIY decoration.
Creative Expansion and Advanced Inspiration
After completing a basic DIY bird bath, many people choose to expand the project into larger outdoor decoration themes or more advanced creative ideas. One popular approach involves creating coordinated garden features using similar materials and finishes. Matching planters, lanterns, stepping stones, or outdoor trays can help establish a consistent design style throughout the space. Mosaic bird baths can be expanded into larger artistic projects with patterned pathways or decorative wall accents, while minimalist concrete-look designs pair naturally with geometric garden layouts and organized landscaping arrangements.
Advanced inspiration may also involve combining bird baths with additional functional outdoor elements. Small solar fountains, decorative lighting, or surrounding seating areas can transform a simple bird bath into a complete garden focal point. Layered landscaping with flowers, climbing vines, or ornamental grasses helps create depth and improves the natural environment for visiting birds. Seasonal decoration updates also provide opportunities for ongoing creativity. Decorative stones, painted finishes, and surrounding accents can be refreshed throughout the year to match changing outdoor themes without rebuilding the entire structure. Another expansion idea involves creating multiple bird baths at different heights to encourage greater visual balance across larger gardens. These advanced DIY concepts allow beginners to continue developing creative skills while building personalized outdoor spaces that combine aesthetic presentation, practical functionality, and long-term decorative inspiration.