

Slab box ceramics are an exciting way to explore pottery and hand-built ceramics. Unlike wheel-thrown pottery, slab construction allows for precise shapes, geometric designs, and a wide range of functional and decorative possibilities. A slab box is essentially a box made by rolling out clay into flat pieces and joining them together using scoring and slip techniques. These boxes can serve multiple purposes, such as storage, decorative containers, or even personalized gifts.
The beauty of slab construction lies in its flexibility. You can experiment with textures, patterns, carving, and surface decoration while maintaining clean lines and structural integrity. With the right preparation, materials, and careful attention to technique, even beginners can create professional-looking ceramic boxes. In this guide, we will explore ten creative slab box ideas, providing detailed instructions, materials, and tips for success. Each idea can be adapted to suit your style, and the principles discussed will help you gain confidence in hand-building ceramics. By the end of this guide, you will have ten inspiring slab box ideas that you can create at home or in a studio.
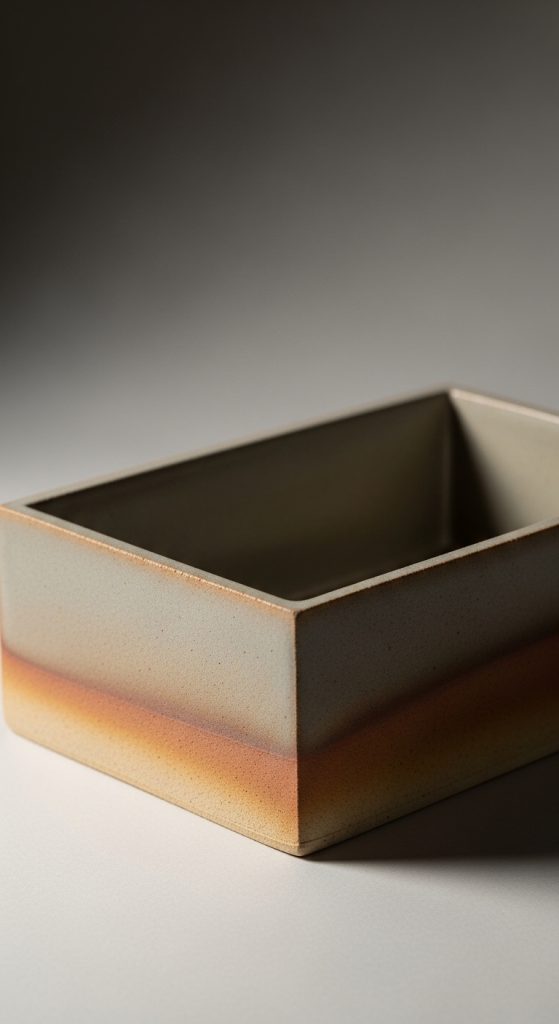
1. Classic Rectangular Box
A classic rectangular slab box is one of the simplest and most versatile ceramic boxes. You start by preparing your clay, preferably a smooth stoneware or earthenware. Wedge the clay thoroughly to remove air bubbles, which can cause cracking during firing. Roll out four rectangular slabs for the sides and one slab for the base, keeping the thickness uniform, around 6-8 mm.
Score and apply slip to the edges to join the sides to the base. Use a straight edge or ruler to ensure corners are square. Smooth the joints with a small modeling tool or fingers. After assembling, add a lid if desired by rolling another slab slightly larger than the top opening. Decorate using simple carving, stamping, or slip trailing before allowing the box to dry slowly. Cover with plastic to avoid cracking. Once leather-hard, refine edges and surfaces with a damp sponge. Bisque fire the box, then glaze as desired and fire again. This classic design is ideal for functional storage, gifts, or as a base for more complex decorative elements.
2. Lidded Box with Carved Patterns
Creating a lidded box with carved patterns allows you to combine structure and decoration. Begin by rolling out your clay to an even thickness of 6-7 mm. Cut out four side slabs and a base slab, ensuring precise measurements. Score and slip the pieces together and allow them to set slightly before decorating.
Once leather-hard, use carving tools, stamps, or simple handmade textures to create patterns on the box walls and lid. You can carve geometric shapes, floral designs, or abstract motifs. Keep the carved depth shallow to maintain the box’s strength. Dry slowly to prevent cracking, covering loosely with plastic. Smooth edges and refine details before bisque firing. After bisque firing, apply glaze, highlighting carved areas with contrasting colors to emphasize texture. This approach not only adds a personal artistic touch but also teaches control over decorative techniques in slab construction. The carved lidded box works well as a jewelry holder, trinket box, or decorative accent in the home.

3. Square Box with Handles
Adding handles to a square slab box enhances both functionality and style. Prepare your clay by wedging it well and rolling out slabs for the base and sides. Cut the slabs to size and assemble the box using scoring and slip. Ensure corners are aligned and smooth joints to avoid weak spots.
For handles, roll two small coils or create slab strips. Attach them to the sides near the top, scoring and slipping both the handle and attachment points carefully. Press gently to secure without distorting the sides. Once assembled, smooth all joints and refine edges. Decorate as desired before drying. Slow, even drying is critical to prevent cracking, especially around handles. Bisque fire the box once fully dried. After bisque, glaze the handles and box either in matching tones or contrasting colors to emphasize the handles. A square box with handles is practical for storage, organizing small household items, or as a unique gift. The handles also allow for creative experimentation with shape and surface texture.

4. Rounded Corner Slab Box
A rounded corner slab box combines clean lines with soft edges for a more contemporary aesthetic. Begin by rolling out slabs for the sides and base, but cut the side slabs with slightly rounded corners. You can use a template or freehand the curves. Assemble the sides to the base using slip and scoring, carefully aligning the rounded corners.
Once joined, refine the curves with a damp sponge or modeling tool to smooth transitions and achieve uniform rounded edges. Optional lids can also be cut with matching rounded corners for a cohesive look. This type of box requires careful drying, as rounded corners may be more prone to warping. After drying to leather-hard, carve or decorate surfaces as desired. Bisque fire before applying glaze. Rounded corner boxes work beautifully for modern decorative storage, as well as gifts, because the soft corners give an inviting and tactile quality. Experimenting with corner curvature also helps you develop a better understanding of slab manipulation and joint strength.

5. Box with Embossed Surface
An embossed slab box adds a dimensional and decorative element to your ceramics. Start by preparing clay and rolling out slabs for the base and sides, keeping thickness uniform. Assemble the box using scoring and slip. Once leather-hard, you can create embossing using stamps, found objects, or hand-carved motifs pressed into the clay surface.
Embossing can be shallow for subtle texture or deeper for a more dramatic effect. Make sure the embossed areas do not compromise the box’s structural integrity. Smooth edges and refine corners before drying slowly under plastic. Bisque fire the box carefully, then apply glaze. Consider using underglaze in embossed areas to make patterns pop or leaving raised areas unglazed for contrast. Embossed boxes are perfect for decorative purposes, and the technique encourages creativity with textures and surfaces. This method can be adapted to any box shape, offering endless possibilities for personal expression and experimentation in slab ceramics.

6. Hinged Box with Slab Lid
A hinged box takes slab construction to a functional and sophisticated level. Begin with standard slabs for the base and sides, joined using scoring and slip. For a lid, roll a slab slightly larger than the opening, and consider designing one side with a folded or extended flap for a hinge.
Hinges can be created using clay pins or loops attached to both the lid and box. Ensure the hinge allows smooth opening and closing without distorting the box shape. Leather-hard stage is best for refining the hinge and edges. Dry slowly, covering lightly with plastic to prevent warping. Bisque fire the box before adding glaze. Hinged boxes are ideal for jewelry storage or keepsakes and demonstrate advanced slab building skills. Practicing hinges also helps improve precision and control, useful for more complex hand-built ceramics in the future. A well-designed hinged box combines aesthetics with functionality, making it a rewarding project for intermediate ceramicists.

7. Tiered or Stackable Box
Tiered slab boxes allow for storage in compact and stylish forms. Begin by making multiple small slab boxes, ensuring each box fits slightly smaller than the one below it for stacking. Roll out slabs for each box layer and assemble using scoring and slip. Each layer can have its own lid or share a larger top lid.
Ensure consistent slab thickness across all layers to maintain stability. Leather-hard stage is ideal for smoothing edges, refining corners, and aligning layers for stacking. Slow, even drying is essential to prevent cracking, especially when multiple layers are involved. Bisque fire the boxes separately to avoid sticking or damage. After bisque, glaze each box individually, experimenting with color gradients, patterns, or textures for visual interest. Tiered boxes are practical for storing small household items like jewelry, craft supplies, or office materials while offering creative design possibilities. They also encourage careful planning in size and proportion.

8. Box with Slotted Lid
A slotted lid box is functional for items like letters, cards, or coin collections. Start with your standard slab box and lid. Cut a narrow slot in the lid before drying, ensuring edges are smooth to prevent cracking. The slot should be deep enough to insert items but not weaken the lid.
Use a small needle tool or carving knife to refine the slot, and smooth edges with a damp sponge. Assemble the base and sides using scoring and slip. Dry slowly, covering loosely to maintain even moisture. Bisque fire the box carefully, ensuring the slot retains its shape. After firing, glaze the box and lid, possibly leaving the slot unglazed or highlighting it with a contrasting color. Slotted lid boxes combine function and style, perfect for a decorative mailbox, donation box, or interactive gift. This project enhances precision skills and demonstrates how slab construction can be adapted to practical designs.

9. Box with Inlaid Clay Designs
Inlaying clay designs into slab boxes creates a striking visual effect. Begin by rolling out slabs for the base and sides. Once assembled, carve shallow areas into the box walls using a needle tool or carving knife. Roll out thin sheets of colored clay and press them into the carved areas, trimming excess.
Smooth edges to blend inlays seamlessly with the surface. Slow drying is crucial to prevent cracks between the inlaid and base clay. Bisque fire after fully dried. During glazing, you can either leave inlaid areas unglazed to show natural colors or apply a transparent glaze to enhance contrast. Inlaid designs can be geometric, floral, or abstract, offering creative freedom. This technique encourages experimentation with color combinations and surface decoration. Inlaid slab boxes make beautiful decorative pieces or functional storage items with a touch of artistry, showcasing skill and attention to detail.

10. Decorative Mosaic Box
A mosaic slab box combines multiple clay colors or textures for a visually rich design. Begin with standard slabs for the base and sides, and assemble using scoring and slip. Cut small shapes from different colored clay and attach them to the box’s surface, either as full coverage or partial decorative elements.
Press shapes lightly into the surface and smooth joints to ensure they adhere during drying. Leather-hard stage is ideal for refining shapes and edges. Dry the box slowly, covering loosely to prevent uneven drying or cracking. Bisque fire, then apply glaze selectively, either covering the entire surface or leaving mosaic areas contrasting. Mosaic slab boxes are ideal for artistic decoration, gifts, or display. This technique encourages creativity with color, pattern, and texture while improving hand-building skills. Mosaic designs also offer endless variation, making each box unique and personal.
