Neutral floral nails combine softness, simplicity, and detailed artistry into one cohesive beauty style that fits a wide range of aesthetics. This nail trend focuses on muted tones such as beige, ivory, soft pink, taupe, and milky white, paired with delicate floral elements that enhance elegance without overpowering the overall look. It has become widely popular in Pinterest ideas searches because it blends natural beauty with modern minimal design, making it suitable for everyday wear, special occasions, and professional environments.
This topic is especially useful for those exploring DIY nail art or beginner friendly manicure inspiration, as it does not require advanced techniques or highly complex tools. Instead, it relies on simple brush detailing, soft color palettes, and creative layering. Readers will learn how to build different floral styles, how to combine neutral shades effectively, and how to design nails that look polished yet understated. The focus remains on practical execution, aesthetic balance, and versatile design choices that can be adapted for home decor-inspired beauty styling trends.
Why This Idea Is Trending or Useful
Neutral floral nails are trending because they align with modern preferences for minimal style and clean aesthetics. Many people now prefer subtle designs that look refined without being overly bright or busy. This nail style fits well into that shift, offering a balance between artistic expression and simplicity. On Pinterest, these designs are often shared under creative ideas, DIY beauty inspiration, and minimalist style boards because they are visually calming and easy to recreate.
Another reason for popularity is accessibility. Even beginners can attempt these designs with basic tools, making it a widely approachable tutorial style trend. The floral element adds creativity, while neutral tones keep the overall appearance wearable in professional or casual environments. This combination of aesthetic appeal and practicality makes it a strong choice for those seeking easy project inspiration, budget ideas, and handmade decoration concepts applied to personal styling.
Materials and Preparation
Before starting neutral floral nail designs, preparation plays an important role in achieving clean and long-lasting results. Basic materials typically include a neutral nail polish range such as beige, soft white, nude pink, and light grey tones. A fine detail brush or dotting tool is essential for creating floral patterns. A clear top coat is required for sealing the design and adding durability. Nail prep items such as a file, buffer, cuticle pusher, and base coat help ensure a smooth surface for application.
Preparation begins with shaping the nails into a consistent form, often almond, square, or rounded edges depending on personal preference. The nail surface should be cleaned and lightly buffed to improve polish adherence. Applying a base coat ensures protection and smoother application of color layers. Planning the floral placement before painting helps maintain balance and symmetry. This step is especially important for DIY beginners who want structured, easy project execution without uneven design placement or overcrowding.
Idea 1: Soft Beige Bloom Accent Nails
How to Create
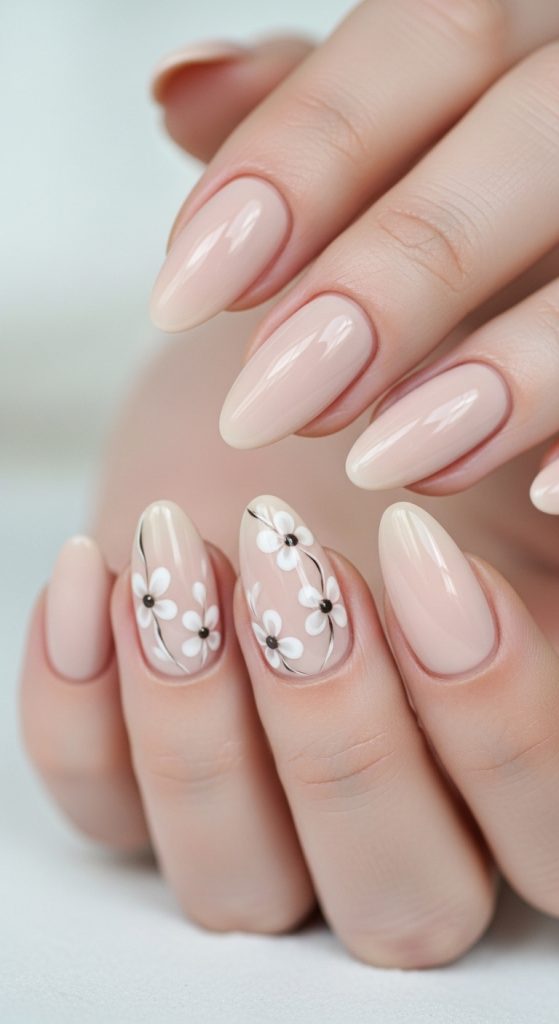
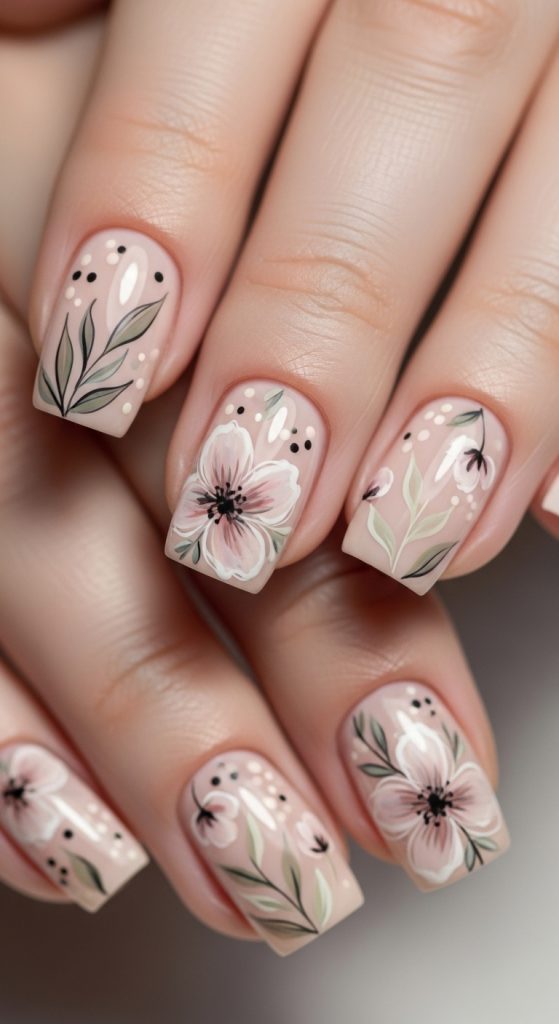
Soft beige bloom accent nails focus on combining understated neutral tones with minimal floral detailing to create a refined and balanced look. The design typically uses a warm beige or nude base that enhances natural nail appearance while providing a clean background for floral accents. Small flowers are placed strategically on one or two accent nails rather than covering every nail, which maintains simplicity and prevents visual overload. This approach is ideal for those who prefer minimalist style aesthetics and want a polished yet creative nail design suitable for daily wear, office environments, or casual outings.
The floral elements in this design are usually delicate white petals with subtle golden or light brown centers to complement the neutral base. This keeps the design cohesive and soft while still adding visual interest. The focus is on proportion and spacing, ensuring each flower appears intentional and balanced. This idea is widely seen in Pinterest ideas boards because it blends modern design principles with traditional floral inspiration. It is also highly adaptable, allowing variations in flower size, placement, and shade intensity depending on personal preference and nail length.
Step-by-Step Guide
To create soft beige bloom accent nails, start by applying a base coat followed by two layers of beige or nude polish for even coverage. Allow each layer to dry completely to prevent smudging. Once the base is set, select one or two accent nails for floral detailing. Using a fine brush or dotting tool, create small white petal shapes arranged in circular or semi-circular formations. Add a tiny dot in the center using a slightly darker neutral shade to complete the floral effect.
After the floral design is complete, allow the nails to dry fully before applying a clear top coat. This step locks in the design and adds a smooth glossy finish. Precision is important during placement to maintain a clean and minimalist appearance. Beginners can practice flower shapes on paper before applying them to nails. This easy project requires minimal tools and is perfect for those exploring DIY nail art inspired by neutral floral aesthetics.
Idea 2: Milky White Minimal Floral Tips
How to Create
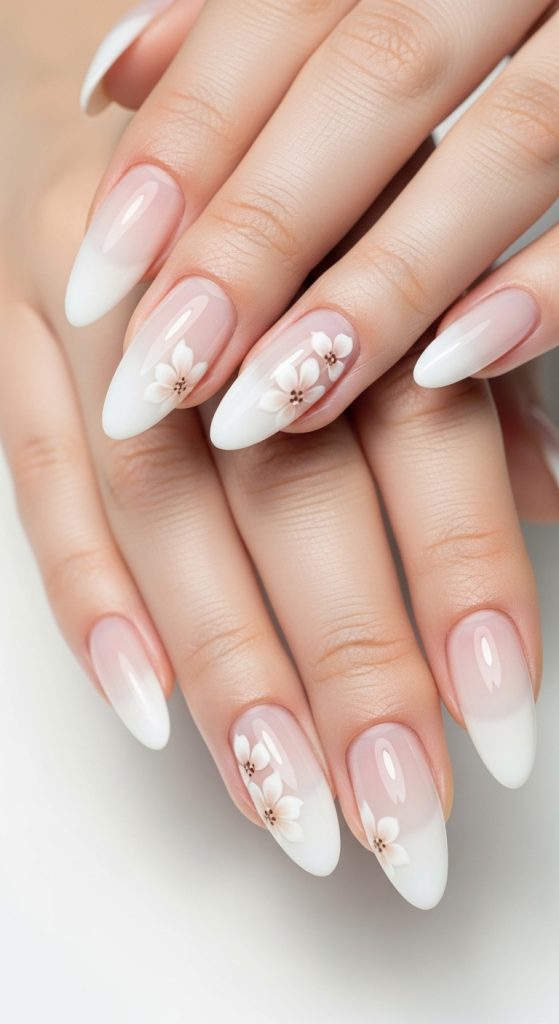
Milky white minimal floral tips focus on a soft gradient-style base paired with subtle floral accents near the nail edges. The milky white base creates a clean and airy foundation that enhances the delicate nature of the floral design. This style is especially popular in modern minimalist style trends because it gives a fresh and polished appearance without heavy detailing. The flowers are usually placed along the tips or slightly below, creating a natural flow that resembles soft botanical framing.
This design works well for individuals who prefer elegant yet understated nail art. The floral patterns are often very fine, using soft pastel tones or pure white detailing to maintain a seamless look. The idea is not to dominate the nail but to enhance its natural shape. This makes it ideal for home decor-inspired aesthetics where simplicity and harmony are key. The design also pairs well with seasonal inspiration, particularly spring and summer themes where floral elements feel naturally aligned with soft visual styling.
Step-by-Step Guide
Begin by shaping the nails and applying a base coat to ensure smooth application. Apply two coats of milky white polish, ensuring an even and slightly translucent finish. Once dry, decide where the floral tips will be placed. Using a thin brush, draw small floral outlines near the edges of the nails. Keep the petals light and minimal, focusing on soft curves rather than detailed structure.
After completing the floral accents, add tiny dot centers using a neutral or soft beige tone. Allow the design to dry fully before sealing with a top coat. This ensures durability and enhances the soft finish of the nails. The process is simple enough for beginners and aligns with easy project beauty routines that emphasize minimal effort with aesthetic results.
Idea 3: Nude Base with Tiny Daisy Clusters
How to Create
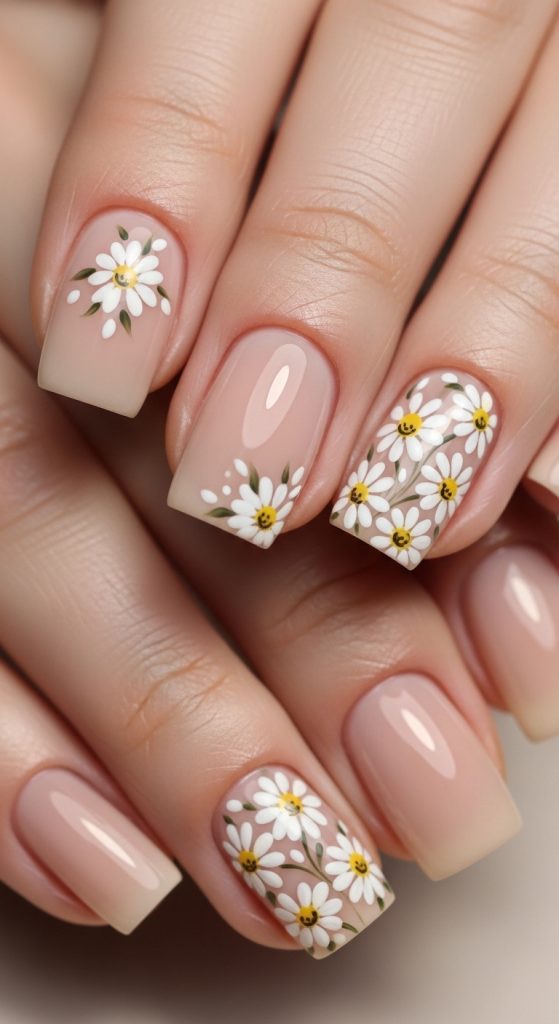
Nude base nails with tiny daisy clusters focus on creating a playful yet refined floral arrangement using soft neutral tones. The nude base provides a natural-looking canvas that allows the daisy designs to stand out subtly without overwhelming the overall aesthetic. This design is widely appreciated in Pinterest ideas collections due to its versatility and timeless appeal. It blends well with both casual and formal styles, making it a practical choice for everyday wear.
The daisy clusters are typically small and grouped in light arrangements rather than scattered randomly. This creates a sense of structure and intentional design. White petals paired with soft yellow centers are commonly used, but muted beige or ivory variations can also be applied for a more cohesive neutral floral nails look. The overall effect is delicate and feminine while still maintaining a minimalist design approach that fits modern creative ideas trends.
Step-by-Step Guide
Start by applying a nude base color evenly across all nails. Once dry, select a few nails for daisy cluster placement. Using a dotting tool, create small circular petals arranged in simple flower shapes. Keep each daisy compact and consistent in size. Add a small center dot in a muted yellow or beige tone to complete the flower structure.
Continue placing clusters in balanced positions, ensuring the design does not become overcrowded. Once finished, allow the nails to dry completely before applying a protective top coat. This step ensures durability and enhances shine. The process is beginner friendly and works well as a DIY tutorial for those exploring soft floral nail inspiration.
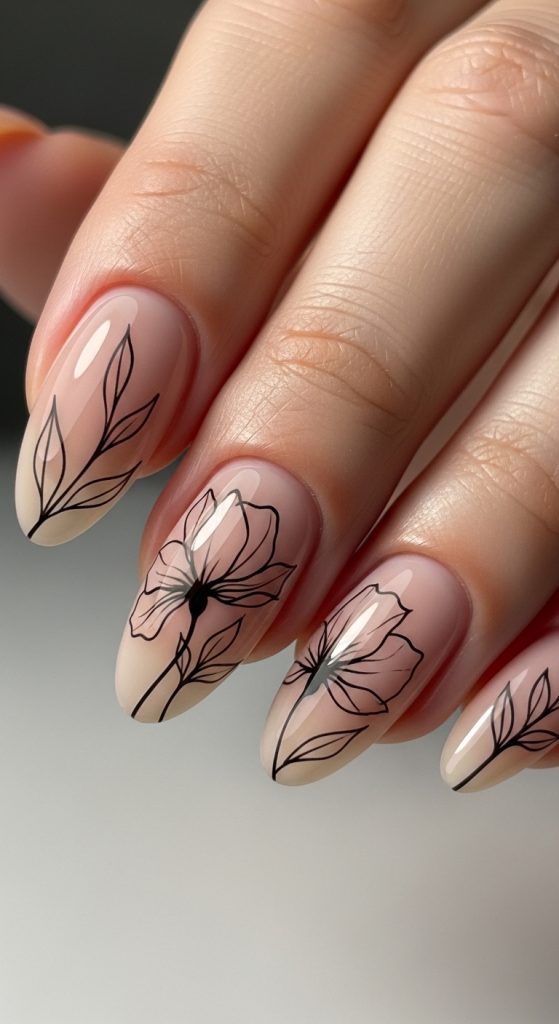
Idea 4: Taupe Floral Line Art Nails
How to Create
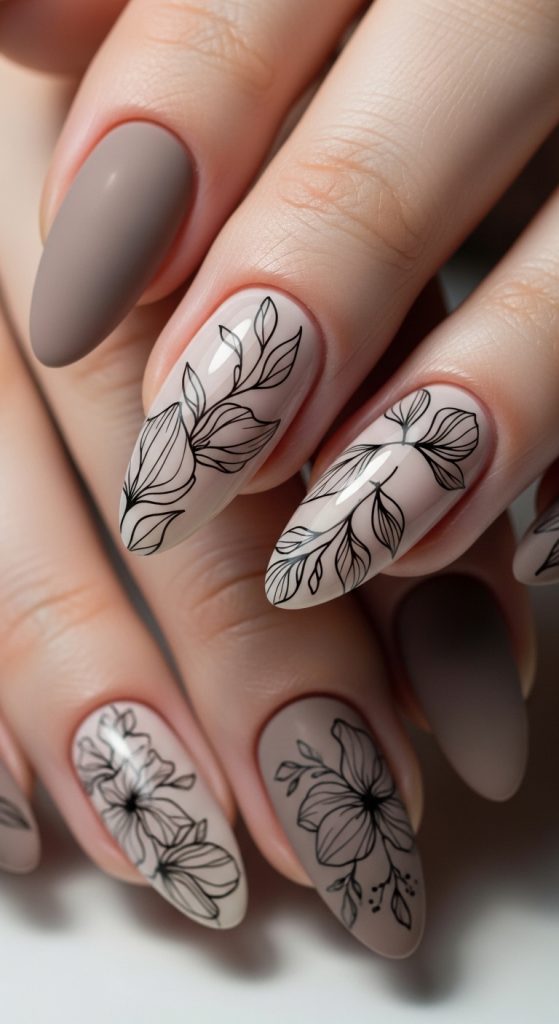
Taupe floral line art nails focus on using thin, precise outlines to create floral shapes over a muted taupe base. This design emphasizes structure and simplicity, making it ideal for those who appreciate modern design and minimalist style aesthetics. The taupe background provides depth without distraction, allowing the floral line art to remain the focal point of the design.
The floral patterns are created using continuous or semi-continuous lines that form petals, stems, and abstract botanical shapes. This technique gives the nails a sophisticated and artistic appearance. It is commonly seen in trending ideas for those who prefer subtle creativity rather than bold decoration. The design works well for both short and long nails and fits easily into professional environments.
Step-by-Step Guide
Apply a taupe base coat evenly and allow it to dry completely. Using a fine detail brush, begin drawing floral outlines in thin strokes. Focus on simple shapes such as single flowers, branches, or abstract petals. Avoid heavy detailing to maintain the minimalist effect.
Once the line art is complete, let the nails dry fully before sealing with a top coat. This preserves the delicate design and ensures long-lasting wear. This approach is highly suitable for DIY beginners looking for easy yet elegant nail art inspiration.
Idea 5: Soft Pink Botanical Overlay Nails
How to Create
Soft pink botanical overlay nails combine gentle pink tones with layered floral elements to create a soft romantic aesthetic. The base color is usually a muted blush pink that enhances natural nail beauty while providing warmth. This style is often featured in Pinterest ideas boards focused on feminine and elegant nail designs.
The botanical overlays include leaves, petals, and small floral clusters placed lightly across the nail surface. These elements are designed to blend into the background rather than dominate it. The result is a soft, flowing design that feels natural and cohesive. It is especially popular in seasonal inspiration themes where light floral detailing represents freshness and renewal.
Step-by-Step Guide
Begin with a soft pink base coat applied evenly across all nails. After drying, use a fine brush to add botanical shapes such as small leaves and petals. Keep the design light and spaced out to maintain balance.
Once the overlay is complete, apply a top coat to seal the design. This ensures durability and enhances the soft aesthetic finish. The process is beginner friendly and aligns well with DIY beauty tutorials.

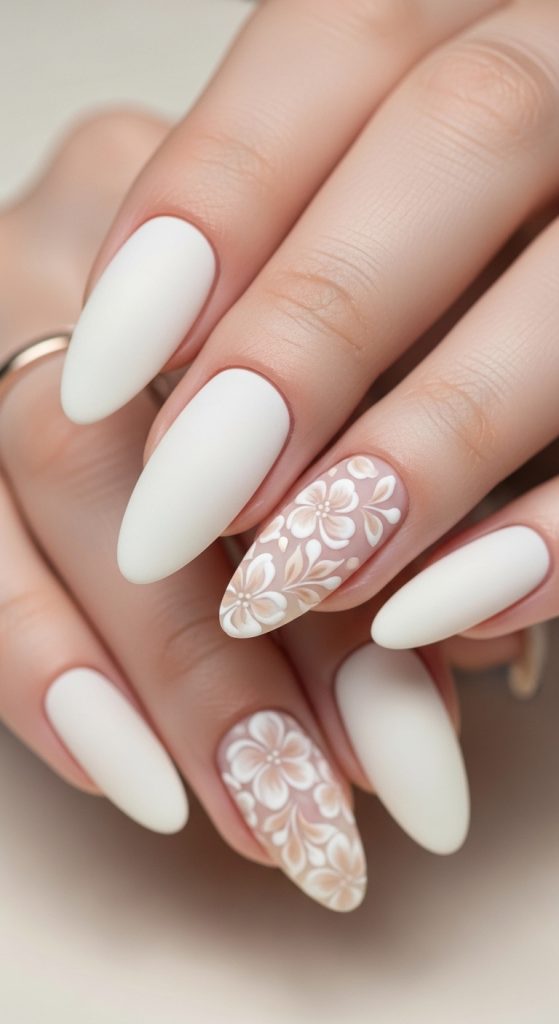
Idea 6: Ivory Matte Floral Elegance Nails
How to Create
Ivory matte floral elegance nails focus on combining a matte finish with soft floral detailing to create a sophisticated and modern look. The ivory base offers a clean and neutral foundation that enhances the subtle floral accents.
The matte texture adds depth and removes shine, making the floral elements appear more refined and artistic. This design is commonly associated with minimalist style inspiration and elegant home decor aesthetics translated into beauty design.
Step-by-Step Guide
Apply an ivory base coat and allow it to dry. Add a matte top coat for texture. Using a fine brush, create small floral patterns in soft neutral tones. Seal the design with a matte finish layer for consistency.
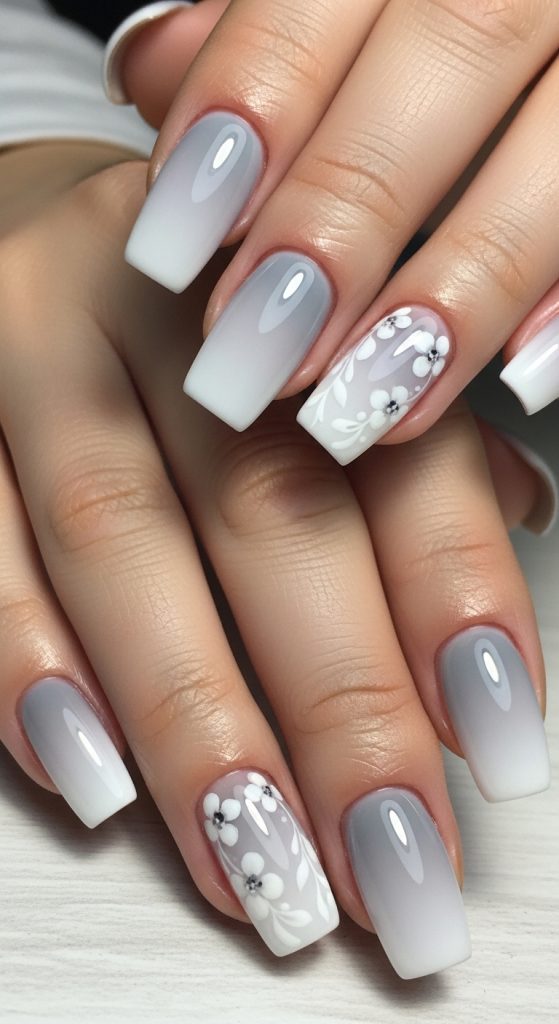
Idea 7: Grey Neutral Floral Gradient Nails
How to Create
Grey neutral floral gradient nails use soft fading tones paired with floral accents for depth and dimension.
Step-by-Step Guide
Apply gradient grey tones, then add floral detailing using fine brush techniques. Seal with top coat.
Idea 8: Minimal Black Line Floral on Nude Base
How to Create
This design uses black line florals on nude nails for contrast and clarity.
Step-by-Step Guide
Apply nude base, draw black floral outlines, finish with top coat.
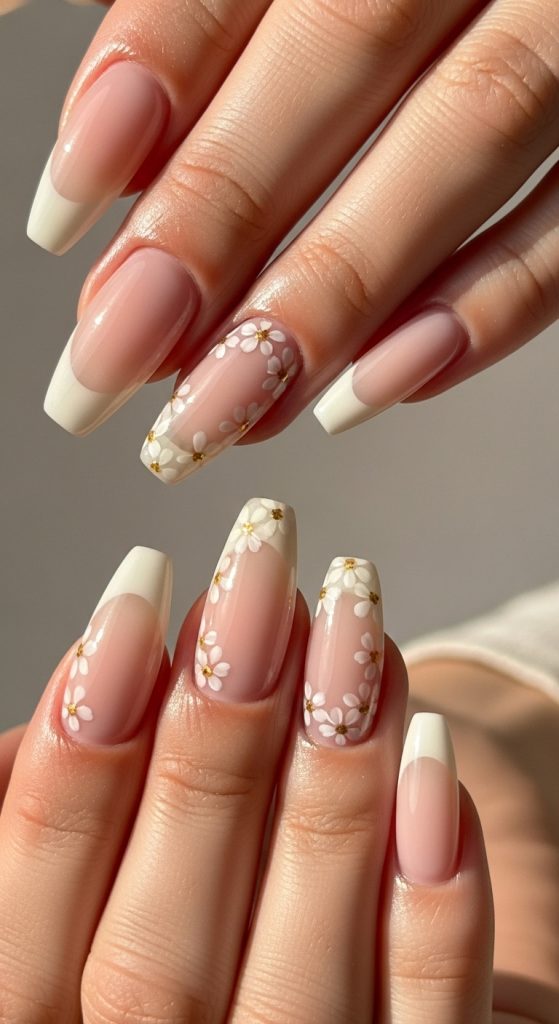
Idea 9: Soft Cream Floral French Nails
How to Create
Cream tones paired with floral French tips create a refined and elegant design.
Step-by-Step Guide
Apply cream base, design floral tips, seal with top coat.
Idea 10: Beige Abstract Floral Mix Nails
How to Create
Abstract floral mixes combine neutral shades with artistic floral placement.
Step-by-Step Guide
Apply beige base, create abstract floral shapes, finish with protective coating.
Common Beginner Mistakes and How to Avoid Them
Many beginners struggle with uneven floral placement, excessive detailing, or using too many colors in neutral floral nails designs. These issues often reduce the minimalist effect and create visual imbalance. Another common mistake is not allowing each layer to dry properly, which leads to smudging and uneven texture. Using thick brush strokes instead of fine detailing tools can also make floral patterns appear unclear.
To avoid these mistakes, focus on simplicity and controlled application. Keep floral designs minimal and spaced evenly across the nail surface. Always allow adequate drying time between layers and use fine tools for precision. Planning the design beforehand helps maintain structure and ensures a clean final result suitable for DIY beginner friendly nail art projects.
Practical Tips for Better Results
Achieving high-quality neutral floral nails requires attention to detail and consistent technique. Using thin layers of polish ensures smoother application and prevents buildup. Practicing floral shapes on paper before applying them to nails improves accuracy and control. Maintaining a steady hand while drawing floral details helps achieve cleaner lines and balanced designs.
Choosing a cohesive neutral palette is also essential for maintaining aesthetic harmony. Avoid mixing overly bright tones that disrupt the minimalist style. A clear top coat enhances durability and adds a polished finish. These simple techniques help improve overall results and align with modern Pinterest ideas trends focused on clean and elegant design execution.
Styling, Presentation, or Organization Ideas
Neutral floral nails can be styled to complement different fashion and aesthetic preferences. They pair well with soft fabrics, neutral clothing tones, and minimalist accessories. This enhances the overall visual harmony between personal style and nail design. Presentation also plays a role in photography or social media inspiration, where clean backgrounds highlight the subtle floral details.
Organizing nail designs by theme, such as seasonal inspiration or color variation, helps maintain creative consistency. This approach is commonly used in DIY beauty planning and creative ideas boards. Keeping designs simple and coordinated ensures that the nails remain elegant and visually appealing across different settings and occasions.
Budget or Time Planning
Neutral floral nails are considered a budget friendly option because they require only basic nail tools and a limited color palette. Most materials are reusable, making this a cost-effective DIY beauty routine. Time planning is also efficient, as simple designs can be completed within a short session depending on detail level.
Beginners can start with simple floral accents and gradually progress to more detailed designs. This step by step learning approach ensures better control and improved results over time. Proper planning also helps manage drying time and application stages effectively, making the entire process smooth and organized.
Creative Expansion and Advanced Inspiration
Once basic neutral floral nails are mastered, there are many ways to expand creativity. Layering different floral patterns, combining textures such as matte and gloss, or introducing abstract botanical shapes can elevate the design. Advanced variations may include gradient backgrounds or multi-floral compositions that create depth and artistic expression.
These expansions allow for more personalized designs while maintaining the core minimalist style. They are ideal for those exploring creative project development within nail art. By experimenting with structure, placement, and subtle color shifts, neutral floral nails can evolve into more complex and expressive designs while still preserving their elegant foundation.