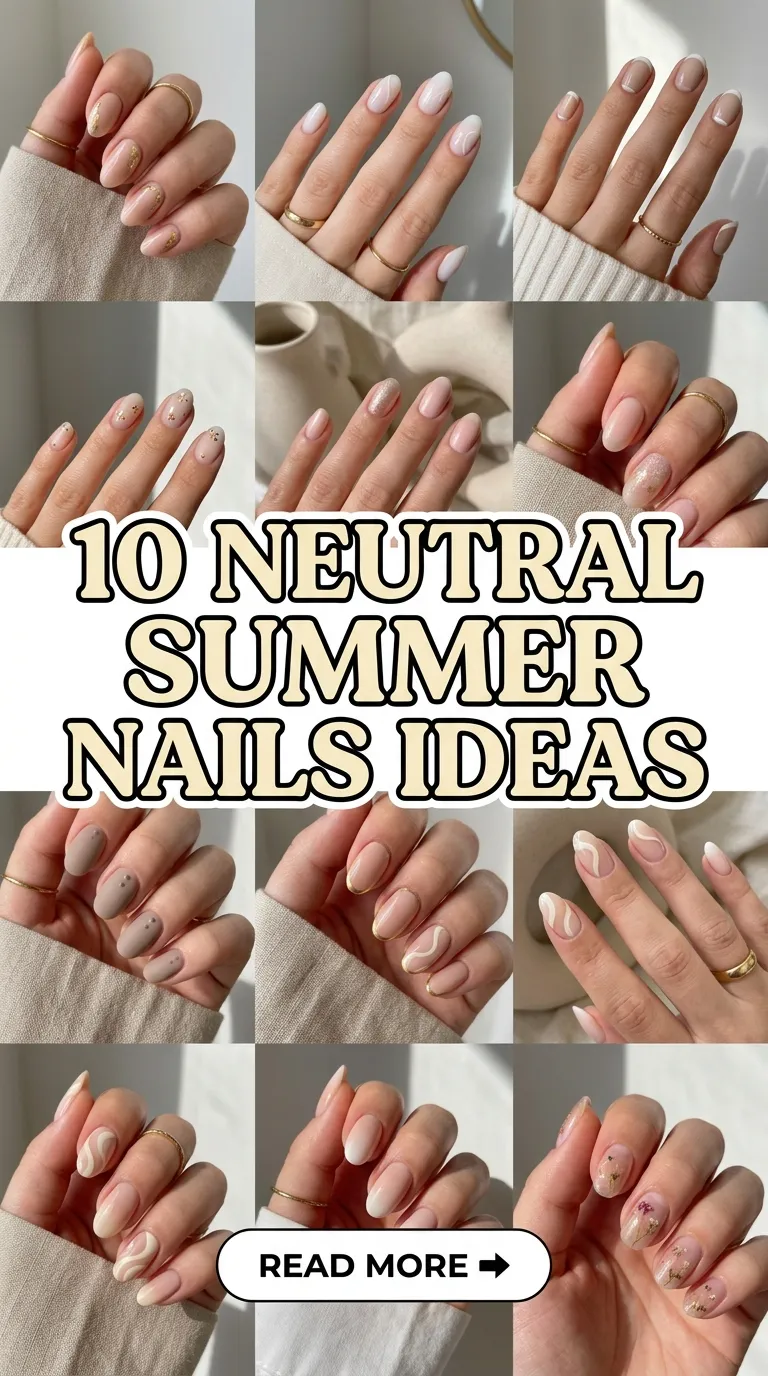

Neutral summer nails have become a consistent choice for modern beauty inspiration because they balance simplicity with elegance. This Pinterest-style guide explores how neutral tones can be adapted into seasonal nail designs that feel light, fresh, and versatile for warm weather. Neutral nails are not limited to plain beige or soft nude; they include a wide range of muted shades such as soft taupe, warm ivory, sheer pink, and sandy beige. These tones work well with summer outfits, natural lighting, and minimal aesthetics that are trending across beauty and fashion spaces. This article explains how to create different neutral nail styles step by step while keeping them suitable for beginners and practical for at-home application. Each idea is designed to offer clear structure, creative direction, and easy execution so readers can follow along without confusion. Whether the goal is a polished everyday look or a soft vacation-ready style, neutral summer nails provide flexibility and timeless appeal.
Why This Idea Is Trending or Useful
Neutral summer nails are trending because they align with the growing preference for clean beauty and minimalist style. Many Pinterest ideas now focus on subtle aesthetics that feel natural yet refined, making neutral nail designs highly relevant for everyday wear. These styles work well in both casual and professional environments, which increases their practicality. Another reason for their popularity is their adaptability; neutral tones complement all skin tones and outfit colors without overwhelming the overall look. They also support DIY nail creativity, allowing beginners to experiment without needing advanced artistic skills. Soft gradients, sheer finishes, and simple line work can be achieved at home with basic materials. The rise of aesthetic, soft-girl, and minimal fashion trends has further increased demand for understated nail designs. Neutral nails also photograph well in natural light, making them ideal for social media inspiration boards. This combination of simplicity, elegance, and versatility explains why neutral summer nails continue to remain a strong seasonal beauty choice.
Materials and Preparation
Creating neutral summer nails at home requires simple materials that support clean application and long-lasting results. Basic nail preparation tools include a nail file, buffer, cuticle pusher, and a gentle nail cleanser. For design application, neutral nail polishes in shades such as beige, soft pink, ivory, and light brown are essential. A clear base coat and protective top coat help improve durability and finish. For more detailed designs, thin brushes or dotting tools can be used, although even basic tools like toothpicks can work for beginners. Preparation is an important step because it ensures smooth application and prevents uneven surfaces. Nails should be cleaned, shaped evenly, and buffed lightly to remove ridges. Cuticles should be gently pushed back to create a neat nail bed. Planning the design beforehand also helps avoid mistakes during application. It is useful to choose a color palette in advance and decide whether the look will be matte, glossy, or slightly sheer. Proper preparation improves both appearance and longevity.
MAIN IDEAS SECTION
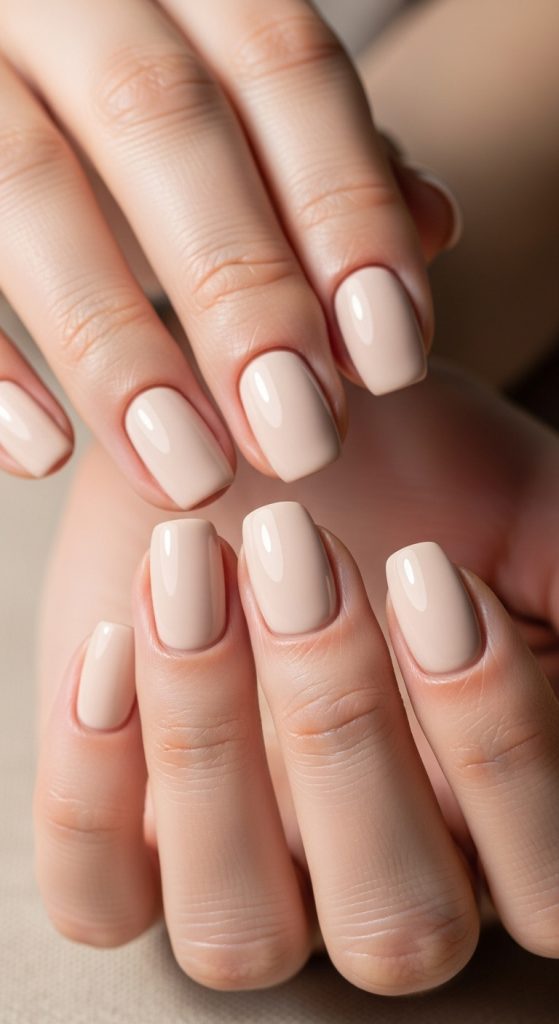
Idea 1: Soft Beige Minimal Elegance
How to Create
Soft beige nails represent one of the most timeless approaches to neutral summer nails. This design focuses on a single muted tone that enhances natural nail beauty without drawing excessive attention. Beige shades work well because they reflect warmth while maintaining subtlety, making them suitable for both casual and formal settings. The appeal lies in their simplicity, which aligns with minimalist style trends frequently seen in Pinterest ideas. This design is particularly effective for those who prefer a clean aesthetic without additional decoration. Beige tones also complement sun-kissed skin during summer, creating a balanced and polished appearance. The overall effect is understated elegance that remains relevant across seasons, especially when paired with light summer outfits and natural textures.
Step-by-Step Guide
To create soft beige nails, begin by preparing the nails through filing, buffing, and cleaning. Apply a thin base coat to protect the nail surface and improve polish adhesion. Once dry, apply the beige polish in smooth, even strokes, ensuring full coverage without streaks. Two coats are usually sufficient for a balanced finish. Allow each layer to dry properly to avoid smudging. Finish with a clear top coat to add shine and durability. For a matte variation, a matte top coat can be used instead. This simple process requires minimal materials and is beginner friendly, making it an easy project for at-home nail styling.
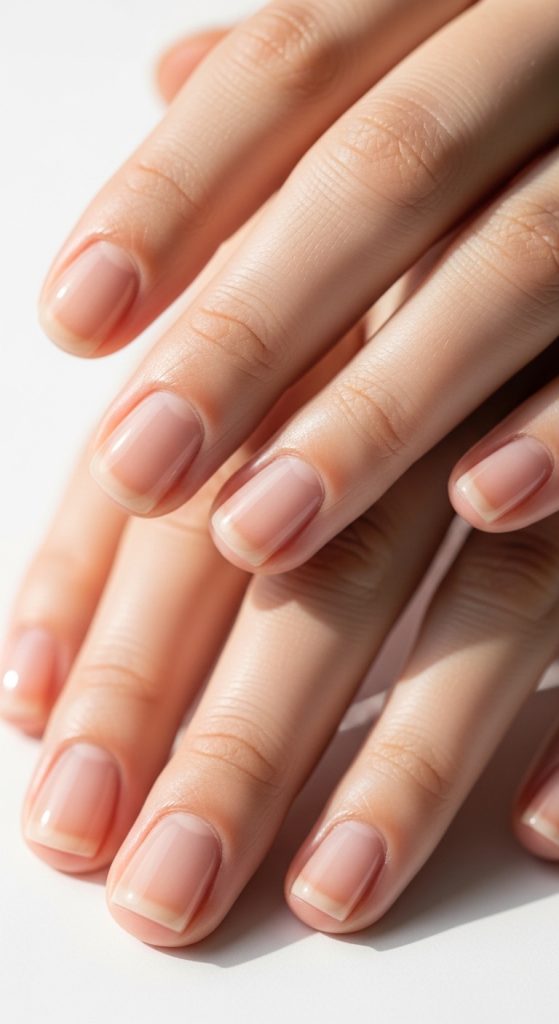
Idea 2: Sheer Nude Glow Finish
How to Create
Sheer nude nails focus on enhancing the natural nail while adding a soft, glossy finish. This style is ideal for individuals who prefer barely-there aesthetics that still look polished and intentional. The sheer effect allows natural nail tone to show through, creating a healthy and clean appearance. It is widely used in modern home decor-inspired beauty trends because it reflects simplicity and balance. The glow finish adds subtle shine without appearing overly glossy, making it suitable for everyday wear. This design is particularly popular in minimalist style inspiration boards due to its soft and natural visual impact.
Step-by-Step Guide
Start by shaping and cleaning the nails thoroughly. Apply a strengthening base coat to create a smooth surface. Use a sheer nude polish and apply one thin coat for a natural effect. If a slightly deeper tone is desired, add a second light coat. Avoid heavy application to maintain transparency. Finish with a glossy top coat to create a soft reflective surface. This style requires precision in thin layering, but it is easy for beginners to achieve with practice. It works best when nails are kept short or medium length for a clean aesthetic balance.
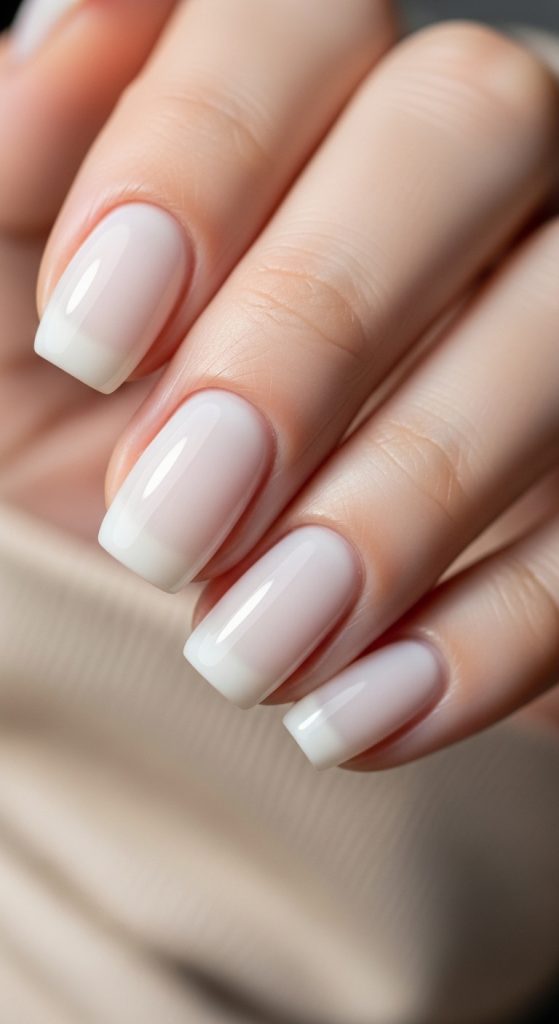
Idea 3: Milky White Soft Blend
How to Create
Milky white nails offer a soft and creamy appearance that fits perfectly into summer aesthetics. This design is popular in neutral summer nails because it creates a fresh and clean impression. Unlike stark white, milky tones are softened with a slight translucency, making them more wearable and gentle on the eyes. This style complements all skin tones and pairs well with both casual and elegant outfits. It is often featured in Pinterest ideas due to its versatility and modern appeal. The smooth appearance makes it ideal for those who prefer a polished but understated nail look.
Step-by-Step Guide
Begin with nail preparation, ensuring smooth and clean nail surfaces. Apply a clear base coat to protect the nails. Use a milky white polish and apply thin layers to avoid streaks. Two coats are typically enough to achieve the desired softness. Allow each coat to dry before applying the next. Finish with a glossy or semi-matte top coat depending on preference. The key to this design is controlled layering to maintain the milky effect without opacity. It is a simple yet refined DIY nail tutorial suitable for beginners.
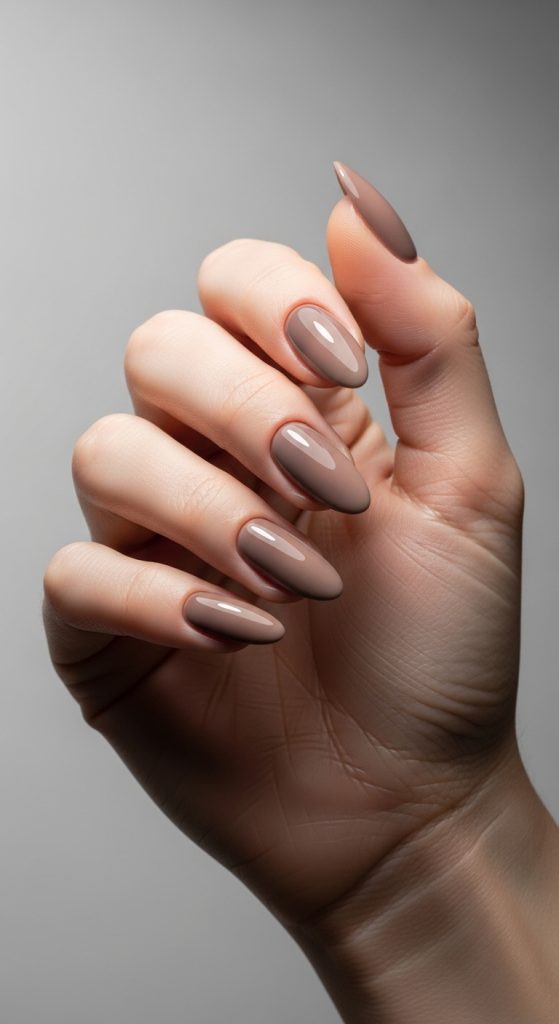
Idea 4: Soft Taupe Gradient Fade
How to Create
Soft taupe gradient nails introduce a subtle color transition that adds depth while maintaining neutrality. This design blends light beige into deeper taupe shades, creating a smooth fade effect. It is widely used in modern design inspiration because it adds dimension without bold contrast. The gradient effect is visually appealing yet soft enough for everyday wear. It fits well within minimalist style trends and is ideal for those looking to add slight creativity to neutral nails. The transition between shades creates a natural flow that feels modern and artistic.
Step-by-Step Guide
Prepare nails by shaping and applying a base coat. Choose two neutral shades, one light beige and one soft taupe. Apply the lighter shade first and allow it to dry. Using a sponge or blending tool, gently apply the darker shade toward the tip of the nail, blending upward to create a fade effect. Repeat lightly until the gradient appears smooth. Finish with a top coat to unify the blend. This technique requires patience but remains beginner friendly with practice.
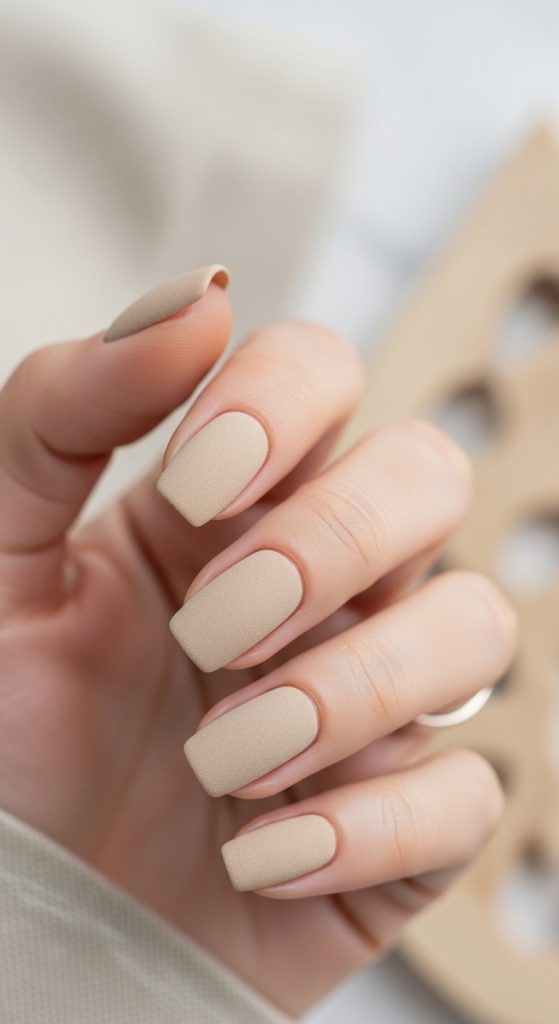
Idea 5: Matte Sand Finish
How to Create
Matte sand nails create a textured visual effect using soft sandy beige tones combined with a matte finish. This style reflects natural summer elements such as beaches and warm earth tones. It is popular in Pinterest ideas because it combines simplicity with subtle sophistication. The matte surface removes shine, giving the nails a modern and velvety appearance. This design is especially suitable for individuals who prefer understated yet stylish nail aesthetics. It aligns with minimalist and natural beauty trends that emphasize softness and balance.
Step-by-Step Guide
Start with clean and shaped nails. Apply a base coat and allow it to dry. Use a sandy beige polish and apply two even coats for full coverage. Once dry, apply a matte top coat to transform the finish. Ensure even application to avoid patchiness. The result should be smooth and non-reflective. This DIY nail tutorial is simple and requires minimal tools, making it accessible for beginners who want a modern neutral look.
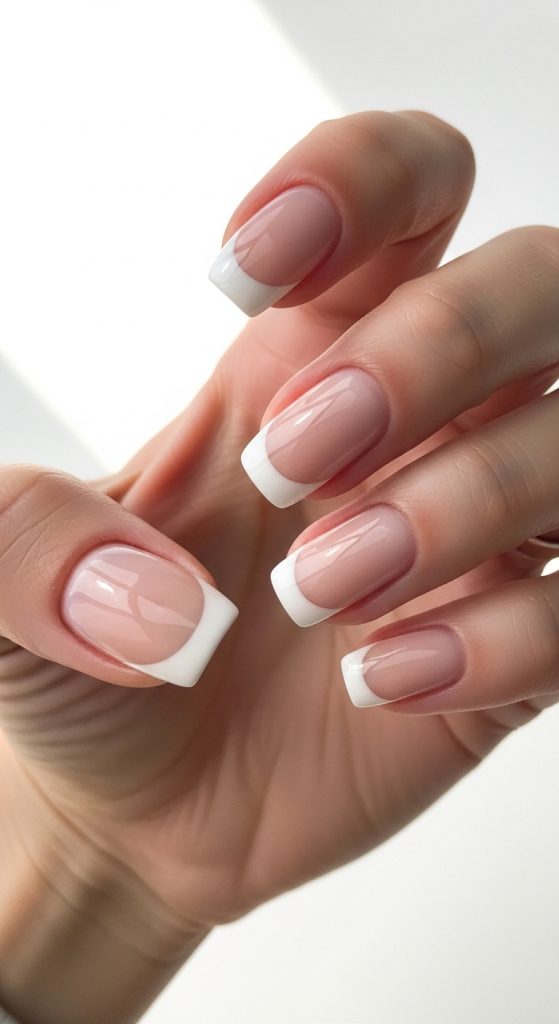
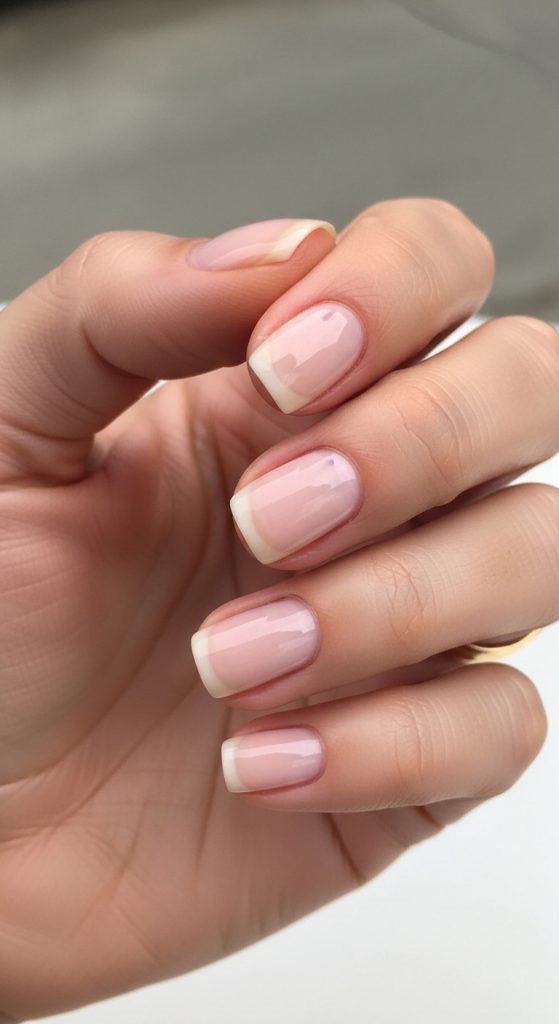
Idea 6: Ivory French Tip Soft Design
How to Create
Ivory French tip nails modernize the classic French manicure using soft neutral tones instead of stark white. This design maintains elegance while adapting to contemporary aesthetic preferences. It is frequently seen in home decor-inspired beauty trends because of its clean and structured appearance. The ivory tip blends gently with natural nail bases, creating a soft contrast that feels refined rather than bold. This style is suitable for all occasions and works well in professional settings.
Step-by-Step Guide
Prepare nails and apply a sheer nude base coat. Once dry, carefully paint the tips using an ivory shade. A thin brush helps maintain precision and symmetry. Keep the line soft rather than sharp for a modern effect. Apply a top coat to seal the design and enhance durability. This style requires attention to detail but remains beginner friendly with practice.
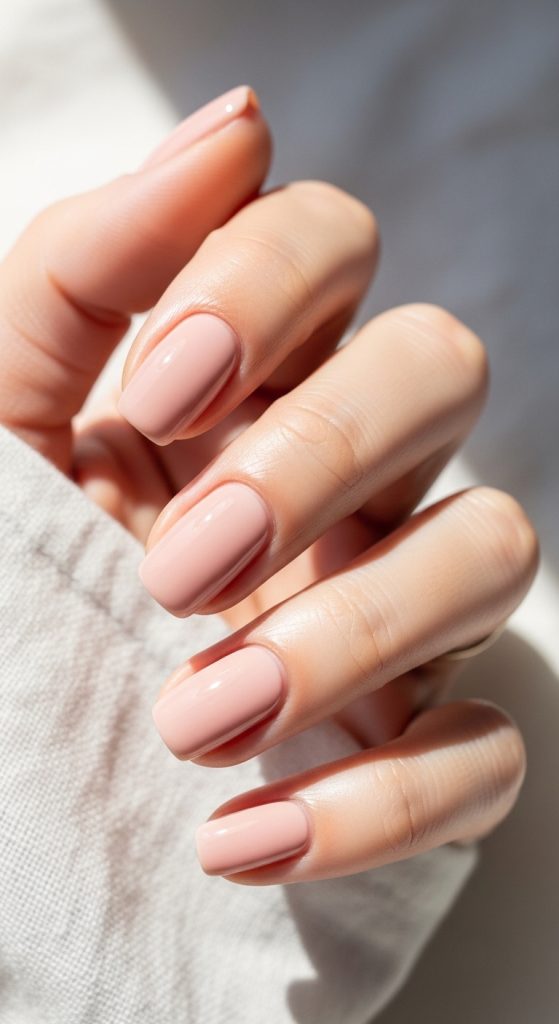
Idea 7: Soft Pink Beige Blend
How to Create
Soft pink beige nails combine warmth and softness for a balanced neutral appearance. This design is ideal for summer because it adds a gentle blush tone without becoming overly colorful. It fits well into aesthetic Pinterest ideas focused on subtle beauty. The combination creates a healthy nail appearance that feels natural and fresh. It is suitable for daily wear and enhances overall hand presentation without being distracting.
Step-by-Step Guide
Apply a base coat and let it dry. Choose a soft pink polish mixed with beige undertones. Apply thin layers for a natural effect. Two coats are sufficient for even coverage. Finish with a glossy top coat for a smooth surface. This design is simple and effective for beginners who want a soft feminine neutral style.
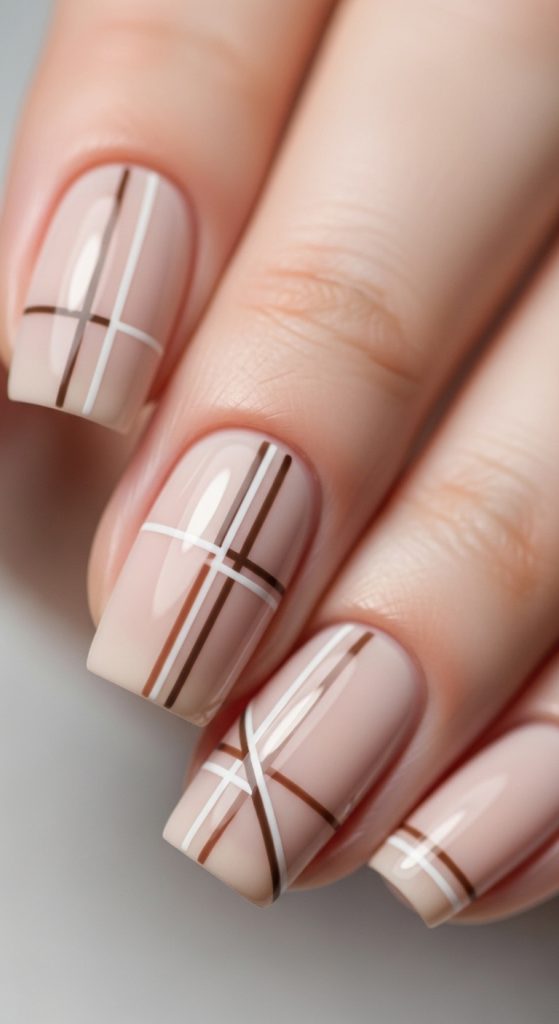
Idea 8: Minimal Line Accent Nails
How to Create
Minimal line accent nails use fine linear details over a neutral base to create subtle visual interest. This design is widely used in modern minimalist style because it adds structure without complexity. The lines can be horizontal, vertical, or diagonal, depending on preference. Neutral backgrounds such as nude or beige enhance the simplicity of the design while keeping it elegant.
Step-by-Step Guide
Apply a neutral base color and allow it to dry completely. Using a thin brush, draw fine lines using a slightly darker neutral shade. Keep the design minimal by limiting the number of accents per nail. Seal with a top coat to preserve the lines. This method is beginner friendly and requires only basic tools.
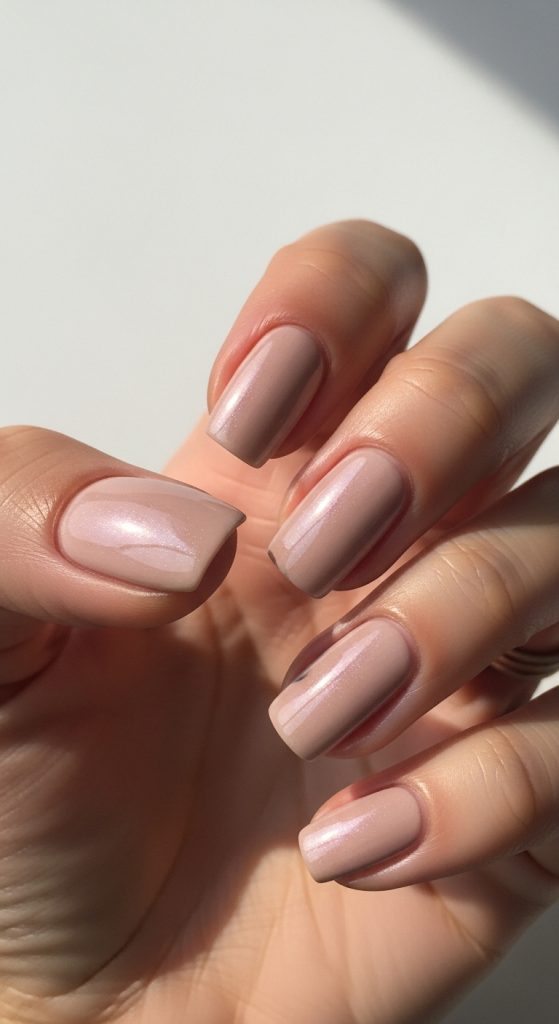
Idea 9: Soft Chrome Neutral Shine
How to Create
Soft chrome neutral nails introduce a reflective finish while maintaining muted tones. Unlike bold chrome styles, this version uses soft beige or nude bases with a subtle shimmer overlay. It creates a futuristic yet understated look that fits modern Pinterest inspiration. The reflective quality adds dimension while keeping the overall appearance neutral.
Step-by-Step Guide
Prepare nails and apply a neutral base color. Once dry, apply a light chrome powder or shimmer layer over the surface. Buff gently to achieve a soft reflective effect. Seal with a top coat to lock in the finish. This design requires careful application but remains accessible for beginners.
Idea 10: Natural Bare Nail Enhancement
How to Create
Natural bare nail enhancement focuses on improving the appearance of natural nails without heavy color application. This design emphasizes cleanliness, shine, and nail health. It is ideal for those who prefer ultra-minimal aesthetics that still look intentional. The result is polished natural nails that align with clean beauty trends.
Step-by-Step Guide
Shape and buff nails gently. Apply a strengthening base coat followed by a clear gloss top coat. Optional light nude tint can be added for subtle enhancement. Keep the finish smooth and even. This is one of the simplest DIY nail tutorials for beginners.
Common Beginner Mistakes and How to Avoid Them
Many beginners struggle with uneven application, thick polish layers, and insufficient drying time. These mistakes often lead to smudging or inconsistent finishes. Another common issue is skipping nail preparation, which reduces polish durability. Using too much product at once can also create streaks, especially in neutral shades. To avoid these problems, apply thin layers and allow proper drying between coats. Nail preparation should never be skipped, as it ensures smooth application and better adhesion. Choosing the right shade for skin tone also improves final results.
Practical Tips for Better Results
For improved neutral summer nails, consistency in application is essential. Always use thin coats instead of heavy layers to maintain smooth texture. Keeping nails clean and shaped evenly enhances overall appearance. Using a quality top coat helps extend durability and adds shine or matte finish depending on preference. Experimenting with different neutral tones can help identify the most flattering shades. Proper lighting during application also improves accuracy.
Styling, Presentation, or Organization Ideas
Neutral nails pair well with soft summer outfits, natural fabrics, and minimalist accessories. They complement aesthetic home decor themes such as clean spaces and light tones, making them ideal for lifestyle photography inspiration. Organizing nail colors in a neutral palette helps maintain consistency in styling. Simple hand poses and natural lighting enhance visual presentation. These styles also work well with organized beauty routines and clean aesthetic themes.
Budget or Time Planning
Neutral summer nails are budget-friendly because they require minimal materials and simple tools. Most designs can be completed at home within a short time frame, typically under one hour depending on complexity. Basic neutral shades can be reused across multiple designs, reducing overall cost. Time planning should include preparation, application, and drying phases to ensure smooth results. This makes neutral nails an accessible DIY project for beginners.
Creative Expansion and Advanced Inspiration
Advanced variations of neutral nails can include layered gradients, mixed matte and glossy finishes, or abstract neutral art designs. Combining textures such as chrome and matte adds depth while maintaining subtlety. Seasonal adaptations can introduce warmer or cooler neutral tones depending on preference. Creative exploration allows for personalized styles while keeping the foundation minimalist. These expansions maintain alignment with modern Pinterest ideas and evolving aesthetic trends.